Blog
Create 3D objects in Cinema 4D from vector art
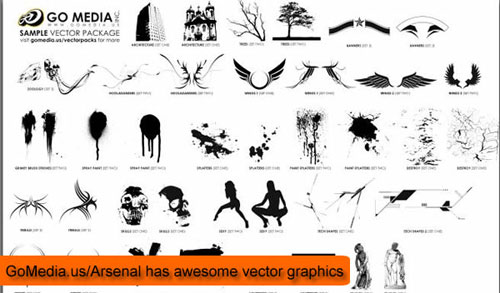
This is a video tutorial on taking vector art and importing it into Cinema 4D to create a 3D object that can be animated, textured, and manipulated in 3D space. In this tutorial, written by David from filmmakingcentral.com he shows you exactly how to do this. David was nice enough to allow us to repost this on our blog. He is using artwork from the free Vector Sample Pack from our Arsenal.
Continue reading to watch the video and read the step by step tutorial.
Tutorial: Vector Illustrations into 3D
I was cleaning out some of my files the other day and came across a folder full of stuff I grabbed at SIGGRAPH this year. I came across this great looking postcard from the gang at GoMedia. Their “Arsenal†royalty free vector art is amazing. I got inspired and thought “let’s make some cool 3D works with it!†So here we go.
The following tutorial has 17 steps but they go fast once you understand what to do. I did this in Illustrator CS3, Photoshop CS3, and Maxon Cinema 4D. You can visit adobe.com and maxon.net for demos to follow along if you like. I used one of Go Media’s Arsenal freebie downloads for the vector art.
Step 1
Open the vector sample from Go Media in Illustrator.
Step 2
Pick a graphic you like. I chose one of the “bannersâ€Â.

Step 3
Select graphic then copy and paste it into a new document. You can leave all the defaults.
Step 4
Feel free to scale the graphic or not. Since its vector you can enlarge it later without any consequences.
Step 5
Save new document with a new name. Then close Illustrator.
Step 6
Open Photoshop.
Step 7
Go to File > Open > your_new_file.ai

Step 8
Command + click (Mac) in Layers tab the file to create a selection.

Step 9
Go to Paths > Make Work Path. Use a tolerance of 1.

Step 10
Go to File > Export > Paths to Illustrator. Then close Photoshop.

Step 11
Open Cinema 4D and go to File > Open > your_paths_to_illustrator_file.ai

Step 12
In the Objects Panel click on the + to expand the imported file.
Step 13
Select all the paths then right click and choose Connect.

Step 14
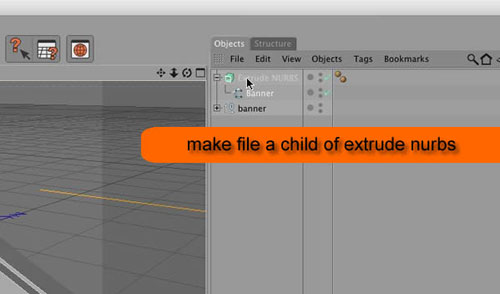
Click on Nurbs > Extrude Nurb to add an extrude nurb to the Object panel.
Step 15
Make your paths file a child of the extrude nurb by dragging onto extrude nurbs.
Step 16
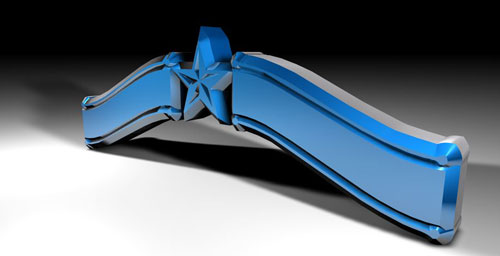
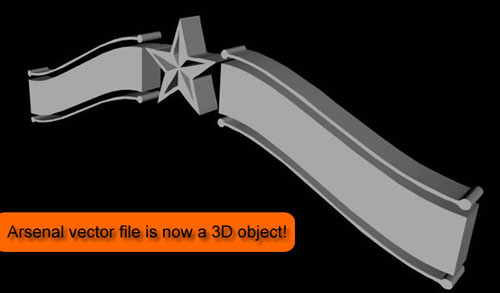
Logo is now a 3D object! Click on render view to see.
Step 17
This file can be animated, you can add materials, lights, background, floors etc. Creativity has no bounds.
Thanks David for writing the tutorial and doing the video demonstration. Again, check out his site www.filmmakingcentral.com.