Blog
Become a Master Designer: Rule Three: Contrast, Contrast, Contrast
Part Three of Seven Easy Principles to Becoming a Master Designer.

Good contrast in your design goes hand-in-hand with your color selections. Contrast is the value difference between the colors on your design. Value is how bright or dark the color (ink) is. Ever see a blank white canvas and as a joke someone says: “Hey – it’s a white cow in a snow storm!” This is an example of no contrast. White on white is no contrast – you can’t see anything.
Elementary right? I mean what kind of stupid tutorial is this? I’m explaining that the piece I’m designing needs to be visible?? This is a retarded concept for a tutorial right?
Wrong.
Because unfortunately, I see lots of problems with designer’s contrast all the time. Not only that, but contrast, when used properly can be an important tool.
Here is one big mistake I see frequently: Designers use color difference to produce contrast instead of value difference. For instance… a medium value blue sitting on top of a medium value red produces some contrast. You CAN see the difference between the two. But when you have two colors together of the same value – it produces what is known as “vibrating.” You’ll notice that at the line where the blue and red meet your eye seems to oscillate back and forth between the two. It almost feels like the text is pulsing.

If your goal is to produce something really vibrant – you can use this technique. But it’s hard on the eyes and most people will find it annoying. Here is another example of the same design using different colors that have more contrast:

This second one is obviously much easier on the eyes.
A quick way to evaluate your design to see if there is sufficient contrast is to convert the entire thing to grey scale momentarily and see if the design still looks clear and easy to read. In Illustrator you do this by selecting your design, and select: Edit>Edit Colors>Convert to Grayscale. In Photoshop you’ll need to flatten your work then you can select: Image>Adjustments>Desaturate. This will convert it to Grayscale.
In either case, you’ll want to undo this action once you’ve had a chance to see how your design looks put to this test.
Here is a sample of the same design –one with good contrast, one with bad contrast. And just under each one is how they both look in grayscale.
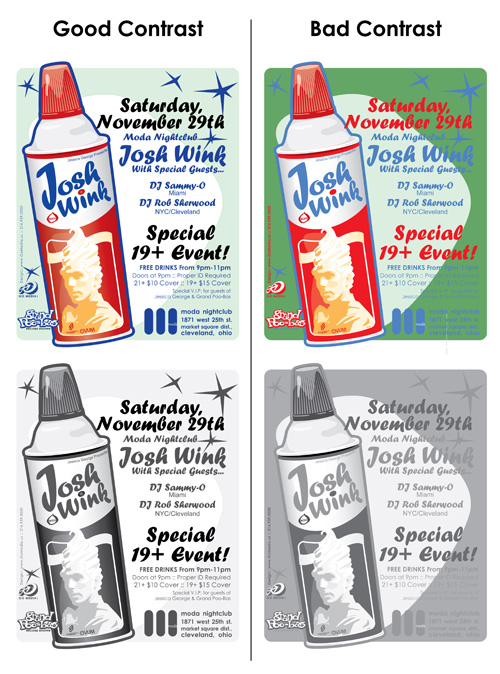
You can clearly see how much easier it is to read the text in the design on the left, particularly when it’s converted to grayscale. The design on the right uses less contrast and more color difference to define the shapes.
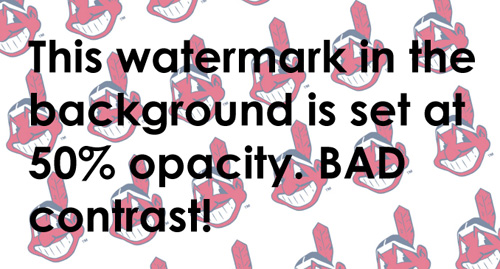
One question I get all the time is: “what opacity setting should I use for a background water mark?” I think a good watermark background should be between 10%-15% opaque. Once again – this is all about maintaining contrast in your design. If the background is light – then the watermark should obviously also be fairly light and vice versa. Here is an example of a good and bad watermark:

The last little thing I want to note about contrast is how it can be used as a tool. If, for instance, you have a need to direct your audience’s attention to something specific on your design – you can accomplish it with contrast! You might keep the entire design relatively light and then make the one spot you want your audience to focus on dark. Here is an example of a well designed landing page:

This is a page on E-Harmony’s tour section of their website. While they want to give people a “tour,” what they REALLY want to do is get people to actually sign-up. So, when you look at this page – what is the biggest darkest thing on the page? It’s a non-clickable picture of a girl and the “Get Started Now” button. Obviously they want you to click on the “Get Started Now” button. Look at how much bigger and darker the “Get Started Now” button is compared to the “Next Step” button. The Next Step button is what someone on the tour SHOULD be pushing to continue the tour – but how tempting is that Get Started Now button? And why? Why does it jump off the page at you? Simple – CONTRAST!
This concludes a fairly basic but fundamentally critical lesson in design. Thanks for taking the time to read this. Four more basics to go. After that I promise I’ll teach you how to draw!