Blog
Create a 3D Vector Labyrinth

A Square Foundation
Let’s start off by creating a new document that’s 1024×768. Name this first layer “Maze.” Then, take the Rectangle tool and draw a 50×50 square. Give this square a 10px black outline and no fill. Then align it to the center of the canvas. Repeat this process, only this time make the square 700×700.

Now we’re going to blend these two squares together. Select the two of them and then type Ctrl+Alt+B (or go to Edit > Object > Blend > Make on your menu bar.)

Now you should have what looks like three squares. We want a few more than this, though. So it’s time to go into the Blend Options and make a few changes.
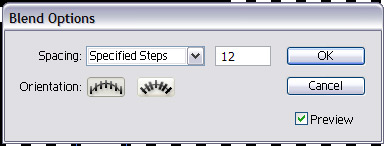
After that’s done, you should have a series of squares that look like this on your canvas.
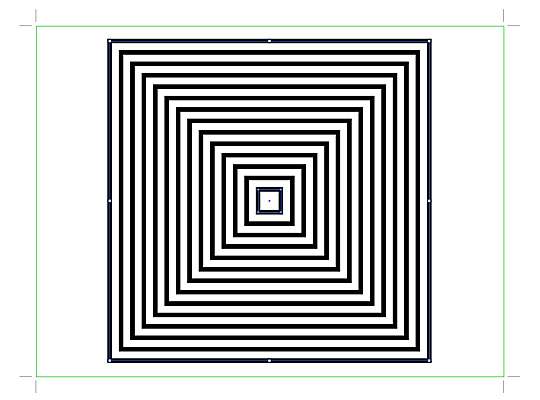
We can’t do anything with these squares until we separate them into their individual shapes. So go to Object > Expand and make sure all the checkboxes for “Object,” “Fill,” and “Stroke” are selected before you hit the “OK” button. Now the squares are separate items. However, they are still grouped. So type Shift+Ctrl+G to ungroup the lot of them. Now you can select each square individually.
A Proper Maze Has a Lot of Twists, Turns, and Dead Ends
A maze is not a number of squares within each other from largest to smallest. A maze is a puzzle where the solution is a winding path amid many twists, turns, and dead ends leads from the outer entrance to the center. So now it’s time to turn this pattern of squares into a true labyrinth.
Take the pencil tool (Shortcut: “N”), change the stroke color to red, and make the stroke width at least 3pts. Then create a new layer above the squares, named “Solution”. Take the pencil and draw a possible solution to the maze through the squares on this layer. It should start in the center and end somewhere outside the outermost square.
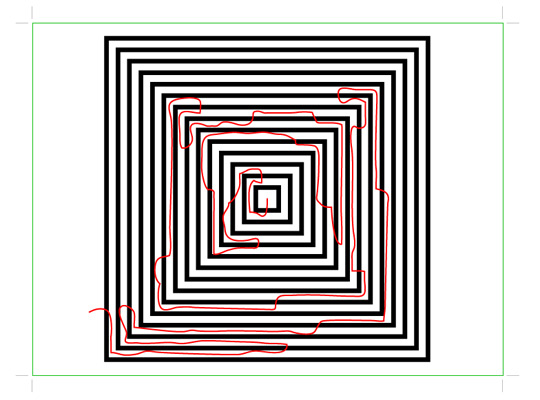
The drawn line does not have to be perfect. Nor does it have to cover the entire square. It can be as simple or complex as you want it, so long as it’s not a straight line from start to finish. After you’ve finished drawing your path for the maze, double click on the “Solution” layer and select the “Template” option. Now we can go back to the “Maze” layer.
We’re going to use two tools to edit the squares on the “Maze” layer. The first tool is the “Add Anchor Point Pen Tool” (shortcut: “+”). The second is the “Line Tool” (shortcut: “/”). Starting with the smallest, innermost box, take the “Add Anchor Point Pen Tool” and add two anchor points on either side of the solution line that crosses through it.

After those two points are added, add one more point between those two. Immediately after that, press the “Delete” key to remove that third point. Now you should be left with a single opening in the center square.


Now take your “Line” tool and draw a line from one side of the small square to the side of the larger square just outside it. Press and hold the “Shift” key while you draw this line to keep it perpendicular to the wall you’re drawing from. This creates your first “dead end” in the maze.

Now it’s just a matter of opening up doorways where the red lines cross the black boxes, and creating walls for dead ends. Don’t forget to create more doorways and walls to create a more complex maze. When you’re done you ought to have something that looks like this:

When your maze is done, select all the black lines on the page. Go up to the “Object” drop-down menu and “Expand” everything. Once everything is expanded, open up the “Pathfinder” tab (shortcut: Shift+Ctrl+F9). Under the “Shape Modes”, press and hold the Alt key while selecting the “Add to Shape Area” button. Any lines that intersected another become a solid shape. Anything not intersecting will be grouped together automatically.


When your maze is fully developed, then you can go ahead and delete or hide the “Solution” layer. It won’t be needed again. Now what you’re left with is the grouped shape on the Maze layer.

Turning the 2D to 3D
Now it’s time to turn this flat maze into a three-dimensional labyrinth. Select the grouped maze image and change the color to gray (#7F7F7F). Then go to Effects >Extrude & Bevel…

When the pop-up menu opens up with all the options, change the settings to what you see below:

If you click on “Ok”, your 3D maze should now look like this:

Adding a Little Flair
For this maze, I want to make it so that the bottoms of the walls blend into the background. In order to do this, we are going to map the labyrinth walls with a simple gradient symbol. On the same Maze layer, create a 100×100 square. Fill it with a gray-to-white gradient (#7F7F7F to #FFFFFF).

With this square still selected, turn it into a graphic symbol by pressing F8. Name it “Wall”.
Now reselect your maze and open up your “Appearance” tab. Double-click the FX layer named “3D Extrude & Bevel”. When the options pop-up has opened up, select the “Map Art” button.
Press the “Next Surface” button on the Map Art options screen until you reach a simple rectangular shape. Whenever you get to a plain rectangle shape go to the Symbols drop down and select your “Wall” symbol. Make sure to press the “Scale to Fit” button.
Note: Although the gradient is mapped to the wall so that the gradient runs white-to-gray from top-to-bottom, when it appears on the actual 3D object, it will be reversed so that it’s gray-to-white.

Keep going through each image and map each visible wall, which are usually shaded in a very light gray. Walls that are not visible will usually be shaded in dark gray and do not need to be mapped. I say “usually” because sometimes Illustrator’s 3D Extrude and Bevel function acts a little buggy with complex shapes like this. Sometimes walls that are visible on the canvas show up as “not visible” in the Map Art pop-up. If you keep the “Preview” box checked, you can see which walls you are mapping on the 3D labyrinth itself as you go. When you’re done mapping all the visible walls, this is how the labyrinth should look:

Finishing Touches
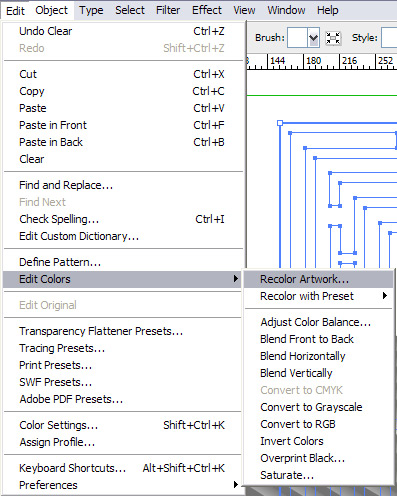
Now we have the fully built 3D Labyrinth. However, let’s add some color. We want to make all the gray portions blue. This is easy enough to fix, and we won’t have to go into any shapes or symbols to do it. First select the maze and then go to Edit > Edit Colors > Recolor Artwork from your menubar.
If you followed the tutorial to the letter, you should only have two colors available to edit in the Live Color pop-up: white and gray. In the “New” color box beside the gray color, change that swatch of gray to blue. Then press OK. Everything that had that gray color, including the gradient in the “Wall” symbol, will now be changed.

The color is now what we want it. However, I want to see more white in the gradient of the walls. All you need to do to change how the walls look is to open up the “Wall” symbol and change the gradient there. If the symbol is deleted, then it can be found again in the Symbol tab (Shift+Ctrl+F11). Double-click the symbol to open it up for editing. Change the midpoint of the gradient from 50% to 75%.

When you’re done with the color and gradient changes, your maze should look like this:

Finally, it’s time to export the final image. Take a moment to center the labyrinth in the middle of the canvas. Then go to File > Export and export the image into the file-type and resolution of your choice. For this example, I chose a JPEG. When you look upon the final exported image, you’ll notice that the image has no jagged edges around the perimeter of the maze. The white portions of the walls blend smoothly into the background. You now have what looks like a labyrinth sitting in the middle of a fog.

In Conclusion
Now that you know how to create this 3D labyrinth, feel free to experiment with any number of shape and color combinations. Variations of this theme can be created using different foundations shapes (circles, hexagons, hearts, etc) and by varying the number of shapes used as well as the thickness of their outlines. If you wish to make the maze large enough so that it fills the entire canvas, I suggest either making the size change before you start mapping the walls (as the symbols do not deform well once they are in place) or exporting the image far larger than your intended image dimensions, and then cropping the image down to the size and view you want.

I hope you enjoyed this tutorial and that it proves useful in a future artistic endeavor.