Blog
Tutorial: How to Make a Weird and Wonderful GIF in Photoshop
How to Make a GIF in Photoshop
As you may know, GIFs are taking the world by storm, and this tutorial, “How to Make a GIF in Photoshop,” is going to teach you exactly how to stay hip with these crazy internet trends. I’m going to walk you through 7 basic steps and by the end you will have your very own GIF that you can show off to your friends, family, coworkers and random strangers on the internet.
Step 1: Obtain a video
Easy enough. You’ll ideally want to use a .mov or a .mp4. GIFs are meant to be weird and wonderful. Make sure your source material is worth watching.
I’m going to choose a video from the best conference for graphic designers – Cleveland graphic design firm Go Media‘s very own Weapons of Mass Creation Fest! Wait and see, it’s a good one. Also, want to use a youtube video? No problem! ClipConverter is completely safe and free, and will convert any youtube video (you just need the URL link) to any format!
Step 2: Open Photoshop and import video
Once you have your video, open up Photoshop and import your video by clicking: File > Import > Video Frames To Layers
A window will then pop up with options. Set up your document as the image below displays. You will also have to select a portion of the video that you want to create a GIF out of.
IMPORTANT: GIFs aren’t movies, this should be a relatively short snip of the video that you want.

Step 3: Set up your document
Now that you have a portion of your video imported, your document will probably look similar to this.

If you don’t have your animation window open (which is shown at the bottom of my image) you’ll want to do that. You can open it up by going to Window > Animation.
Secondly, you will want to adjust your image size to 500px in width. Why? Because GIFs are meant to load quickly, and they can’t do that if they are a huge file size! Making your GIF 500 pixels will help it load quickly and run smoothly! Plus, sites like Tumblr require that your GIFs be under a certain size, so this step is essential.
Step 4: Edit your frames
Now that you have your document set up, and your video imported, you can start working with your frames (which will be located in your animation window). First hit play and see what you’re currently working with. Then identify the frames you want to keep, and delete all of the surrounding ones. After this step, I ended up with 14 frames which you can see below.

IMPORTANT: Again, remember, you want to keep your GIF short and sweet. Aim to have around 10-20 frames. Impossible? No worries! If you still have 20+ frames after cutting out the part you want of your video, select all of the even numbered frames and delete them. This will make your GIF slightly choppier and faster, but we can fix that later when you edit your frame rate!
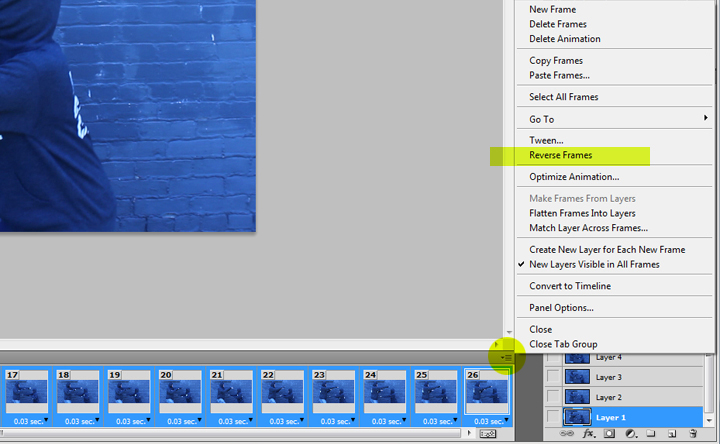
Step 5: Create an infinite loop (Optional)
This step is completely optional, however, it’s a fun effect to add to your GIF. If you play your GIF right now, you’ll notice that there is a clear beginning and end. However, you have the ability to work with the frames and create a GIF that reverses backwards and creates an infinite loop. These kind of effects are the fun, inventive things that no other GIF program allows.
So how do you do it? Simple. Copy all of your frames, except the first and last, then paste them back into your Animation window and drag them to the far right. Then click your options panel (shown in image below) and hit “Reverse Frames.”

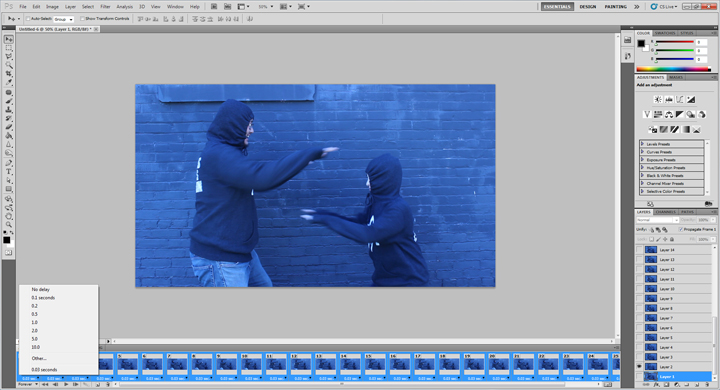
Step 6: Change your frame rates
A frame rate is the total time each frame will show! Photoshop will automatically make all your frames .03 seconds, however, this tends to be fairly fast. Your frame rate will always be a personal preference and will also depend on your particular GIF, however, I usually try to stick around .08 to .1 seconds.
You can change your frame rate by looking at your animation window, and clicking the small arrow that is displayed in each frame. Make sure you highlight ALL of your frames though before changing your frame rate.

In Step 4, if you ended up deleting all of your even numbered frames, you’re GIF will automatically be faster than originally, so you’ll probably have to make your frame rate around .1 to .2 seconds.
IMPORTANT: Don’t 100% trust the speed of your GIF in Photoshop. You won’t be able to truly tell how fast it is until after you export it (which will be shown in the next step)
Step 7: Export!
Now that your GIF is beautifully and personally constructed, you’re ready to create an actual file of it!
To do this click: File > Save for Web & Devices, and then follow the image below for what to fill in.

IMPORTANT: Like I stressed above, it’s important that your GIF file size is small. As displayed, my GIF is 1005K. You’ll definitely want to make sure your GIF is under 2 MB. If not, many sites may not be able to load your GIF.
If your GIF is over 2 MB, you’ll want to either cut out more frames, or you can adjust the colors, dither and lossy in this panel. Any of these will decrease the quality of your GIF, but if done in small amounts, it can sometimes be barely noticed.
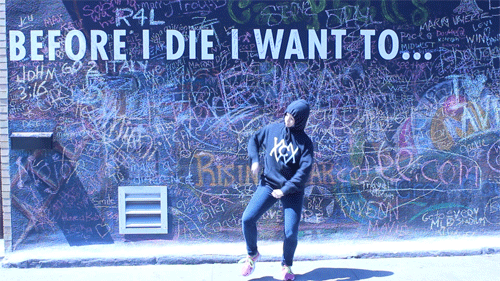
And here is my final product!

CONGRATS!
You have created your very first GIF. Time to celebrate.
(Remember to watch the footage from the best design conference in the entire world, Weapons of Mass Creation Fest! Check out the full WMC Fest video here and buy tickets to Weapons of Mass Creation fest – coming up this summer at downtown Cleveland’s Allen Theatre.)