Blog
Advanced Digital Painting in Photoshop

Hello!
My name is Hatice Bayramoglu and I am a 3D artist and illustrator from Turkey. In this tutorial I demonstrate how to draw and color a character design and illustration for a children’s book. I’m going to explain my choices and thought process throughout the tutorial. My tutorial shows how I build my illustration from an early rough to the final illustration. I suggest that after following this tutorial, you find out what works best for you. I will be using Adobe Photoshop and a Wacom Tablet to create the finished result.

This painting is going to be done totally in Photoshop CS2.
STEP 1: Sketching
Start by creating a new document in Photoshop. It should be about 800x778pixels. I started with some quick sketches about the main idea. And here is the sketch about my main environment for the character.

Well as you see in this sketch there is a little girl character standing near an apple tree with an apple in her hand. She is smiling because she is happy and a perhaps also a little sad.
STEP 2: Setting Brushes in Photoshop
Here is the only brush that I’m using for my character coloring. For my painting I am going to use only standard brushes.

Before you begin painting, you’ll need to set your brush settings. Start by selecting the Brush tool then using a standard brush such as the one shown below.

STEP 3: Color Palette
You must decide on the colors you’ll use before you start on the painting. Here are my colors used for this artwork:

STEP 4: Layers
Create a new layer called “sketch”. You can create this sketch in Photoshop or on paper. After you created the sketch layer, change the blending mode to Multiply and always keep it as the top layer so that you can see it as you’re painting.
Now, look at how my layers are set up. I have layers for all the objects in the sketch. Painting on new layers allows you to easily make corrections later in the painting. It is much easier to fix errors if the main elements of your painting are separate entities. This step is really really very important!
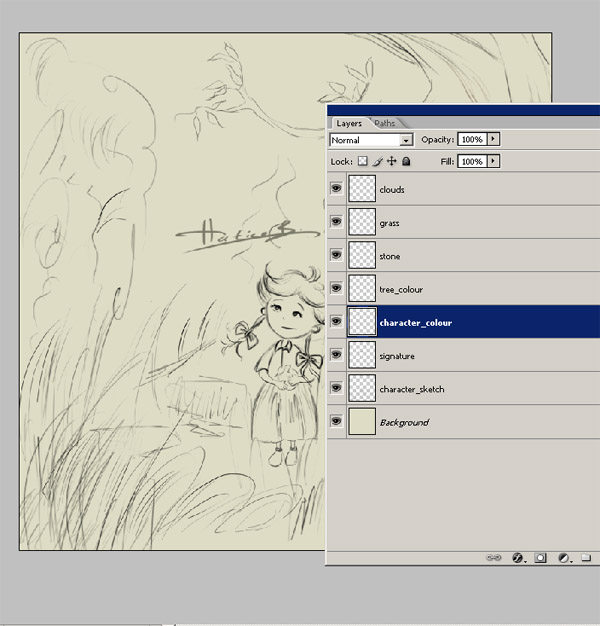
STEP 6: Working On The Background Color
Here, let me show you how I colored the background. Choose the Paint Bucket Tool (G). After you filled the background, it must be like this. Make sure that your layer setup is the same as shown in the images below.


STEP 7: Coloring the Main Shapes
Before continue the painting process let me show you my layer order again. I just changed the order of the layers because sketch layer must be on the top of all layers and its setting must be set to Multiply. At this point, we can start coloring the sketchwork and you can define the main shapes. Using the Brush tool (B), begin painting the character and the tree on their own separate layers. Make sure that your brush has a hardness of 100%. A brush with a soft edge can produce blurry results.

And at this step I would like to change the size of my file because I want to add finer details. So I open Image>Image Size, and increase the file dimensions to 1500×1459.
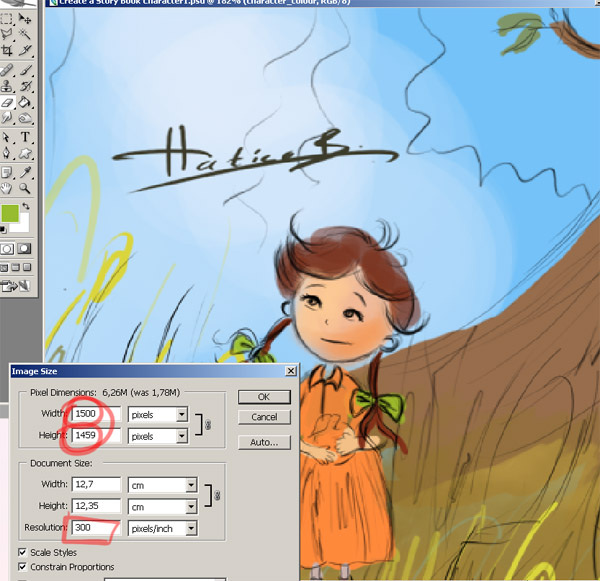
STEP 8: Adding Details
Now I can start to add the details. In this step, I started by coloring the face of the character. Make sure you have the proper layer selected before painting.

And here I have made a new copy of the tree layer and then I have made some details on the tree. I also closed the first tree color layer.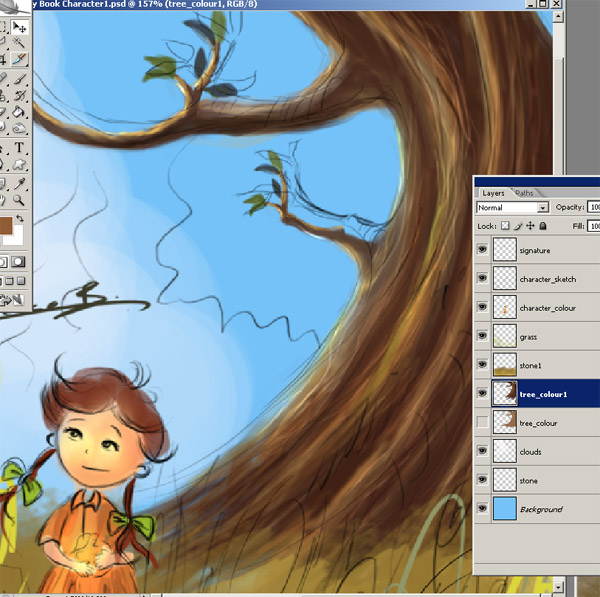
Now here is a screenshot for the details. I began to add some more details on my painting, like grass and some little flowers. At this step I have created a new layer named “flowers”.

I’m adding some more colours and thin lines of detail on the tree.
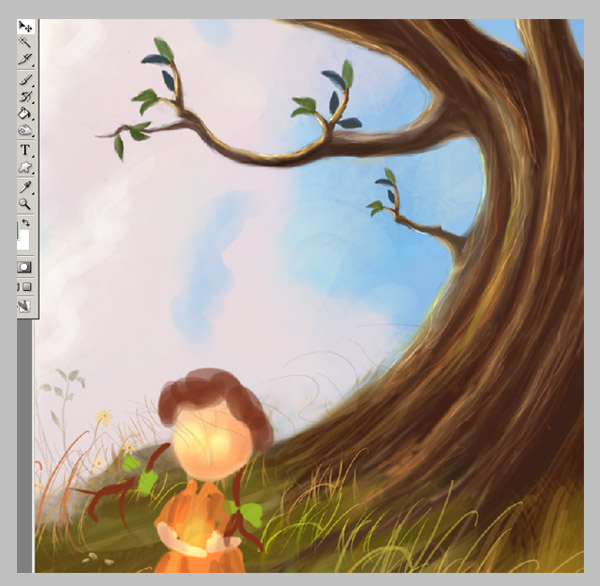
Now take a look at all details which I just made. I continue to add more details and opening some new layers when I need.
STEP 9: Special Attention to the Character
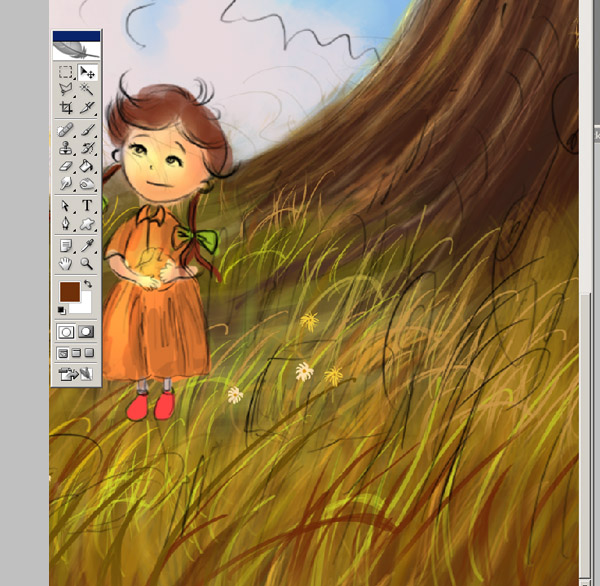
Now that I’m satisfied with detailing the scenery and the tree I add some details for her clothing. At this point I realized that my character is looking very simple and not so good, so I thought it was time to make some changes. I tried some out some different looks for the character, and continued to add more details. Again, pay attention to my layer order here. At this step I have some more new layers as you see. All layers have a name.

I’ll now begin to add small details on the character, adding more yellow and green colours. By the way don’t forget at this step you don’t have to over detail everything. At this point I kept working on main details and lights, until I got a nice contrast. Sometimes I have to change some colors. At this point I am pretty much finished painting her clothing and body. I also pulled the sketch layer a little to one side for you to see how the character is looking without the sketch base.

STEP 10: Adding Polish & contrast
I used Color Dodge for the bright areas. This is how it looks once all the adjustments are done with the Color Dodge and Burn tool. I continue to add more details to the tree using various brush sizes and color. Once there are enough details, I begin to smooth it using a brush with a soft edge. I also use the Dodge and Burn tools to shade the branch.
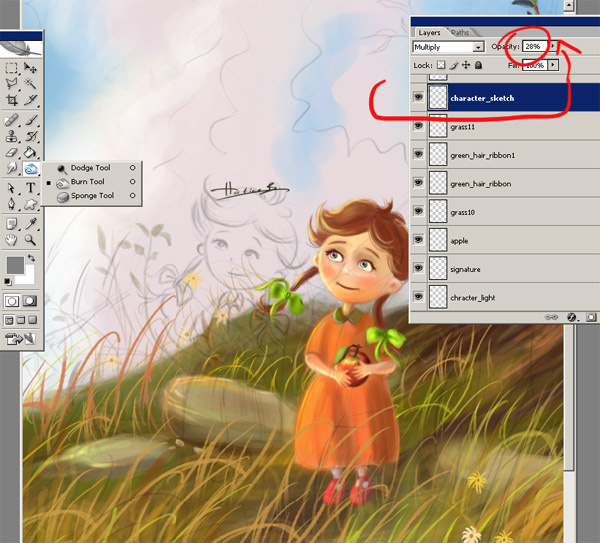
And also I do want to show you how I added those darker areas on my tree layer. I used Burn Tool for this effect. I always use this when I want to add some dark areas on my illustrations.

And I do add some strokes with the Smudge tool too. I use this because I want to add soft blurry areas to the cloud and the background. At this point I saw my cloud is not so detailed. So, I have created a new layer to paint some cloud details using both the Smudge tool and the brush.

STEP 11: Adding More Details
At this point I realized that my painting needs more flowers . So I make a new layer and paint some little nice simple flowers as you see. I continue adding more details. I add some strokes with the Dodge tool, I use this because I want to add some slight light areas on the grass.

Now after finishing work on the grass and the background, I can start to add more details on her hair and face. I choose the Color Dodge and add some brush strokes her face.

Now pay attention at the details which I made using only the color dodge tool.

STEP 12: Color Correction
The painting is all but finished with the exception of color correction. First, merge all layers. Now, from Image>Adjustment>Brightness>Contrast you will change the colors a little. I do want the illustration to have a little more sunny effect.
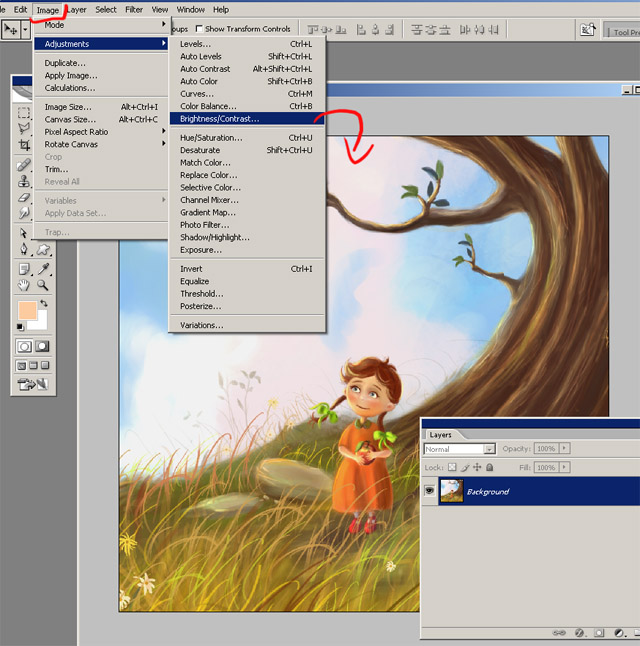
And from Image/Adjustment/Brightness/Contrast make the settings as I did. Here is how the illustration is looking more sunny and more gleeful and joyful.

Final Illustration
And here’s the final image, I hope you found this tutorial interesting. Thank you for reading.
