Blog
Creating a Fantasy World
Intro: We often dream of living in a fantasy land. Creating such a fantasy in Photoshop is really great fun. In this tutorial we will be creating an imaginary world where we will be covering interesting topics such as the use of two point prospective, utilizing references for a better result, new and advanced tools of Photoshop CS5, and a few additional tips for image manipulation.
Preview:
Tutorial Details:
Program: Adobe Photoshop CS5
Difficulty: Beginner, Intermediate
Estimated Completion Time: 1hr
Resources:
Model : Model
Brushes : Clouds , Clouds 2 , Abstract Glow , Planets.
Desert Plants: Plant 1 , Plant 2
Bamboo : Bamboo
Pyramids : Pyramid Reference, Pyramid
Hill : Hill
Step 1:
Open a new canvas in Photoshop with Width=2560, Height=1440. Then, draw a rough sketch of the set that we are going to create. This sketch will be assist us during the process of analyzing components that we will be creating during this tutorial.
Step 2:
Import the image of the model onto the canvas and place the model to the right side of the canvas as shown.
1) Now to clone the empty portion of the image, create a mask around the empty portion as shown using the Selection Tool (M).
2)In this step we will be using the new Fill tool with the Content-Aware option available in Photoshop CS5 and above. The Content-Aware option can intelligently clone the selected area by referencing the surroundings.
Hold Shift+Backspace to open the Fill Tool, then set Use dropdown to Content-Aware, press OK, and within few seconds you can see the magic of this great feature.
3)After the Content-Aware/Fill finishes it’s work you may find a few overlaps as indicated in the image. In order to cover these errors select the Clone Stamp Tool(S) and make sure the errors are perfectly covered.
Step 3:
According to the sketch we drew in the first step, we need to place few elements behind the model. Hence create a selection around the model using the Pen Tool(P) . Then separate the selection into a new layer by pressing Ctrl+J.
Step 4:
Now import the image of the Ancient Wonder Pyramids and then by using the Move Tool (V) and transform the image to fit the prospective we’re working with in our main file.
Step 5:
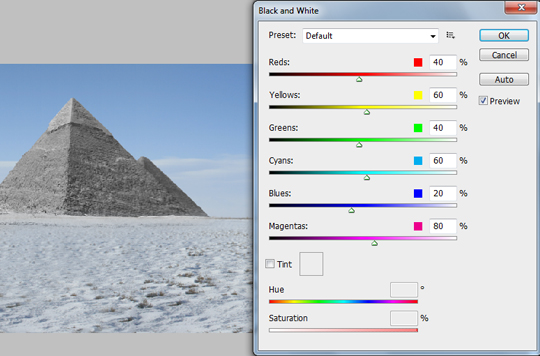
The original pyramids are in the color of the desert sand. But here, the location is similar to a white desert; hence, we must change the pyramids to the color of our image.
1)With the pyramids layer selected go to Image>Adjustments>Black and White (Alt+Ctrl+Shift+B) and set the values as shown.
2) Now brighten the pyramids by setting the Exposure levels to Exposure=+0.52, Offset=+0.0673 and Gamma Correction=1.00.
3) In this step, observation plays a key role. Open the Curves(Ctrl+M) and color-correct the pyramids by referring the sand color carefully. The result of the curves should be as shown.
Step 6:
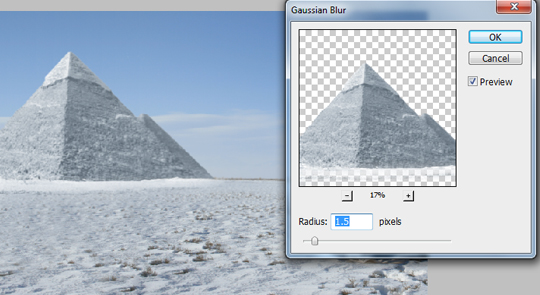
In this image the pyramids are located far from the model, hence they should be blurred in order to accurately emulate the depth of field in the image.
With the ‘pyramid’ layer selected add a Gaussian Blur(Filter>Blur>Gaussian Blur) of Radius=1.5px.
Step 7:
Generally when any huge structure is seen from a far distance, the base appears to be mixed-up with the color of the surroundings, making it almost invisible. Check the following image for reference (Thanks, iStockPhoto).
Now, by using the Eye Dropper Tool, select the color of the sky just above the horizon and paint the base of the pyramid as shown using the Soft Brush(B).
Step 8:
Adhering to perspective is very important while working on Matte Painting or Set Extension. It makes our work easier in placing an image or creating an object which fits perfectly with the perspective of the main image.
1) Select the Line Tool(U) to draw the prospective lines. For this image we will be using two point prospective, hence make two points on the horizon and draw the prospective lines as shown.
2) In this step we will be creating the outline of the flying triangles. Draw two inclined lines as shown from the vertical line that we drew in the previous step.
Step 9:
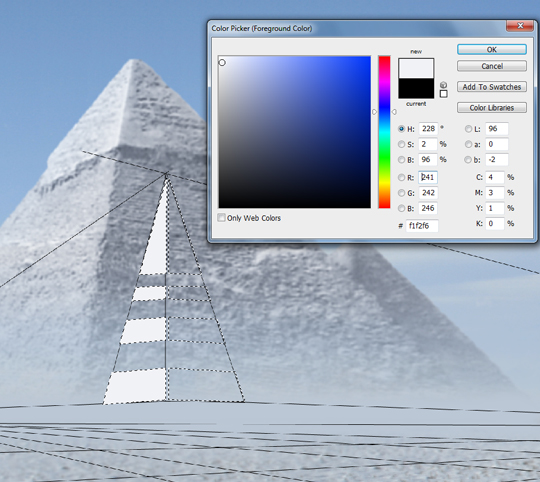
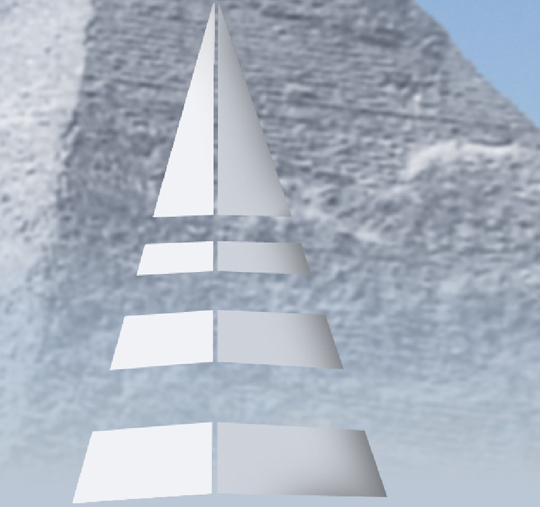
1) Now by using the Pen Tool(P) create a selection in the shape as shown within the triangle and paint the left side of the triangle with the color #f1f2f6. The reason for using this color is because this part of the triangle is exposed to sun, and we want to match the lighting.
2)The right side part of the triangle depicts the slightly shaded part of the triangle, hence paint it with the color #cdd2da.
3)Now add some shadows to the triangle as shown to provide more depth to it.
Step10:
1) To create the frame for the triangle, select the image of the bamboo stick from it’s original image. Cut the stick out and place it in a new layer.
2)Turn the image into Black and White by using Image>Adjustments>Black and White and set the values as shown.
3)Now import the image of the bamboo onto the working canvas and place it as shown using the Move Tool. Duplicate the bamboo image to complete the frame.
Step11:
Draw a vertical line using the Line Tool to represent the size of the second triangle, then draw the prospective lines to it as shown. Following this method can limit the number of lines to be drawn for the prospective and make it easy to concentrate on the required area.
Step12:
Repeat the 8th and 9th steps to complete the second triangle.
Step13:
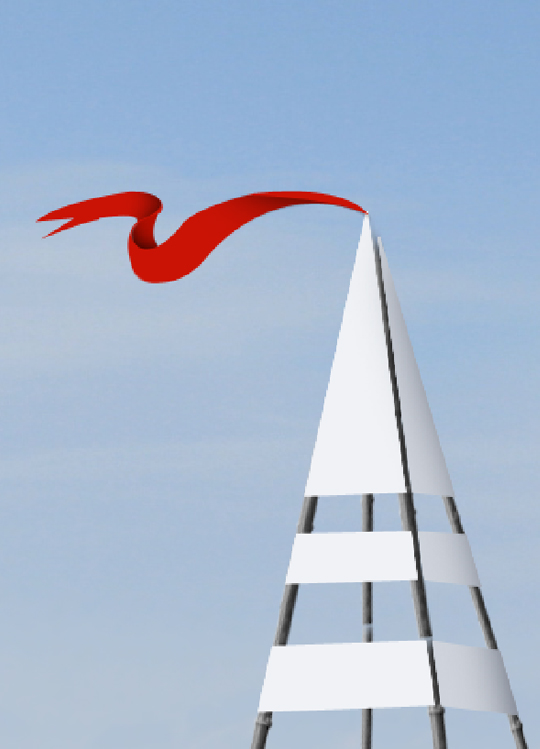
1) To create a flag on the top of the second triangle, create a mask in the shape of a randomly waving flag as shown using the Pen Tool (P). Then fill the selection with color. We liked red, but feel free to get crazy and choose something else.
2) Creating the shadows to the flag can give a natural depth for folds. Using the pen tool create a mask as shown and shade the masked area using the Soft Round Brush with black colour.
3) Similarly, follow the previous steps and complete the shading of the flag as shown.
Step14:
In this image, the camera focus is concentrated on the model. Since the second triangle appears to be far from the model it should be blurred in order to maintain the depth of field. Add a Gaussian Blur of radius 1.8px to the second triangle.
Step15:
The flying triangles are not stationary and thus should be given some Motion blur to indicate the movement. To get this effect, create a mask on the left edge of the triangle as shown and set the Feather Radius of the mask to 14px.
Then add a Motion Blur (Filters>Blur>Motion Blur) of Distance 17px and set the angle to -4.
Step 16:
Repeat Step 15 to the flag to make the flag look as if it is moving with the turbulence of wind.
Step 17:
Repeat Steps 14 and 15 for the first triangle. But, since this triangle is closer to the model, the Gaussian blur should be 0.8px.
Step 18:
Duplicate the second triangle without the flag and place them as shown according to the sketch.
Keep increasing the Gaussian Blur value with the increase in distance of the triangle from the model.
Step 19:
In this step we will be using an advanced, yet easy way to cut an image with fine detail using the newly updated Refine option in CS5.
1) Import the image of the desert plant that we are going to place on the left side corner of the image as illustrated in the sketch. Then by using the Lasso Tool (L) select a rough mask around the plant.
2) Now open the Refine Edge (Alt+Ctrl+R), and paint the selected area using the Refine Radius Tool to get a quality result. Set the output to new layer to get the result without any layer mask.
If you like to change the mask in any circumstances you can set the output to New Layer with Layer Mask.
3) Place the desert plant image to the left side, bottom corner as shown.
Step 20:
Repeat the previous step with the second desert plant and place it near the first desert plant to complete the bush.
Step 21:
In this step we will be adding another mountain beside the original one. Here we consider the original mountain as our reference and try to get the same effect.
1) Import the image of the mountain onto the canvas and erase the base of the mountain using the Soft Eraser.
2) Now add a Gaussian Blur of Radius=1.3px to the mountain to match the focus of the original mountain.
3) Color-correct the mountain by referring the original mountain to get the following result.
Step 22:
Deserts are never calm; they have sand flying with the wind. Creating this effect can give a completeness to our manipulation.
Create a new layer on top of all the layers and create the sandy fog using the fog brushes with whitish color.
Step 23:
We previously said that the triangles are flying in air, and since the sun is shining bright we need to create shadows for them.
1) Using the perspective lines we drew before, create the shadows as shown.
2) Since the triangles are flying by some distance from the ground, the shadow doesn’t have sharp edges because of the slight interference of sunlight. Add a Gaussian blur of radius=5.0px to the shadow, then reduce the opacity of the shadow to 51%.
3) Follow the same procedure for all the triangle shadows.
Step24:
Create a planet on the right side as shown using the planet brush with white color, and then reduce the opacity of the layer to 61%.
Final Result:


