Blog
How to make a vector pattern brush
Hey everybody! I hope the last few weeks have gone well for you – whatever that may mean. I hope that you found at least a little time to soak up all the great resources and knowledge being shared around the design blogosphere. Finally I hope you enjoy this little tutorial and share it with your design friends.
We’re going to make a pattern brush.

We’re going to start in Illustrator (I’m using CS3).
I chose to make a wavy line brush because it’s relatively easy and it teaches the basics of pattern brush construction without a lot of messy details. It also gave me a chance to share another technique involving blend modes and distort filters.
So to start off, hit the backslash key or click the line segment tool from your Illustrator Toolbox. Draw a line about 650px wide. Now hit “v” to switch to your selection tool and select the line segment. While holding the ALT key (Option key on a Mac), drag the line segment down about 80px. You’ll see that holding the ALT key while dragging makes a copy of the selected object. Now, I hope you didn’t click anything else, because we’re going to hit CTRL+D to duplicate the last action again. Now you should have three lines nicely spaced on top of each other.
Like this:


Now we’re going to make a blend between these three lines. First we need to modify the default blend options.
Go to Object>Blend>Blend Options.

Change the default setting from “smooth color” to “specified steps”, and then change the number of steps to about 8.
With all three lines selected, hit ALT+CTRL+B, or
go to Object>Blend>Make.
You should now have 8 lines between each of your original 3 lines.


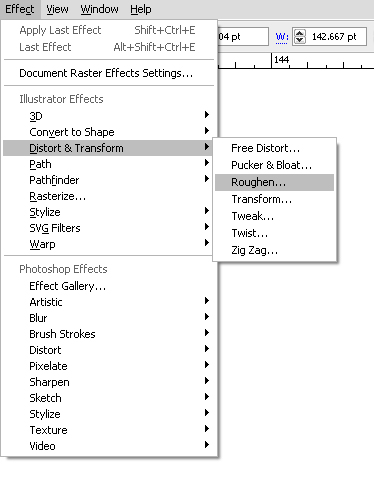
Looking good so far. Let’s give our lines some personality with a distort filter. For this brush I used the Roughen filter. With your lines selected, go to
Effect>Distort & Transform>Roughen.

The Roughen filter has quite a few options. I changed the defaults from “corner” to “smooth”, and decrease the size and detail to 6 and .93, respectively. The screenshot below shows the effect I got from those settings. Just put in whatever settings look good to you – it won’t prevent you from following the rest of this guide.


We’ve got a little change of pace coming. We’re going to have to move out of Illustrator for a little bit to get this pattern brush… well… patterning.
Open Photoshop and make a new document 2500×2500 pixels.

Copy your wavy lines from Illustrator and paste as a smart object into your Photoshop Document. After you paste, hold the shift key and scale the smart object so that it just touches the edge of your document.

Photoshop’s Offset filter shifts the pixels of your image by a certain amount. This is really handy for making edges seamless.
Go to Filter>Other>Offset
(They really hide this super useful filter, huh).
Since your document is 2500 pixels wide, set the shift to something about 1/2 of that, or close to 1250 pixels. Make sure the “wrap around” option is checked.

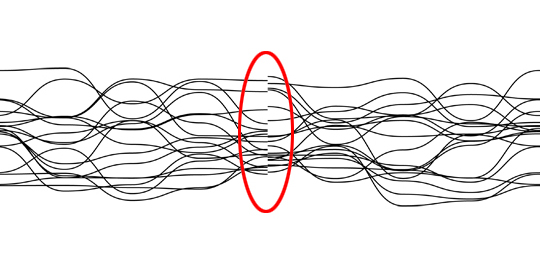
You’ll see the seam right away. It should be just about dead center. This is what we need to fix.


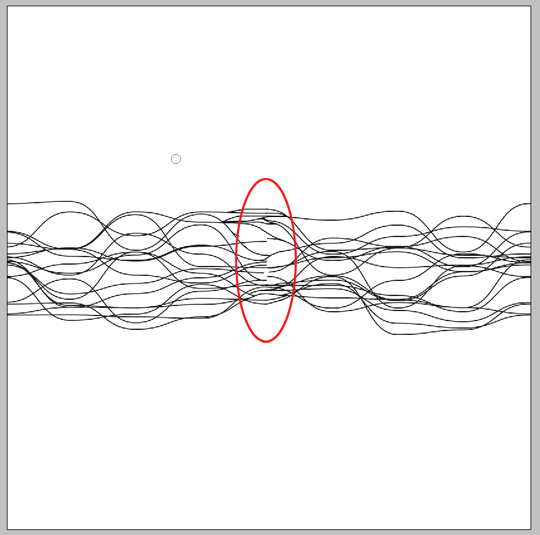
Fixing this seam is really the only subjective part of this whole guide. It really helps if you have a Wacom set up. Hit “B” to activate the brush tool. Set it to 100% hardness. Now just use the bracket keys to find increase or decrease the size of the brush until it’s equal to the thickness of your lines. For me, this was about 4px. Now erase and draw in the lines so that they connect nicely. Here’s how mine looked about 1/2 through the fix-up:

Keep at it. Try to imitate the movement of the rest of the lines. This will depend on what Roughen settings you chose back in Illustrator.
Finally, okay I’m done.

Save your document as a PSD somewhere handy, and we’ll get back to Illustrator in the next step.

We’re almost there. Let’s get that PSD into our Illustrator document.
Go to File>Place
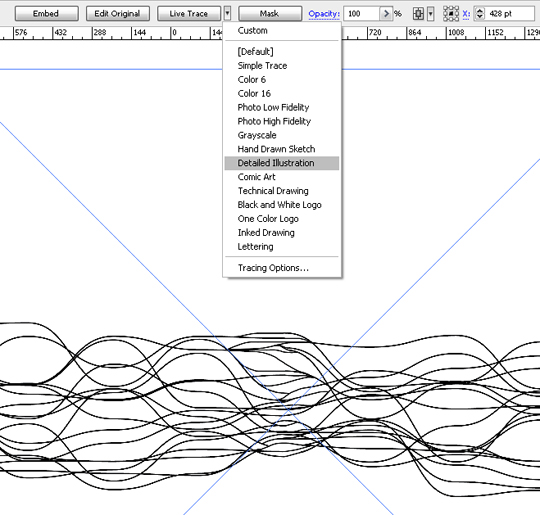
and browse to the PSD you saved. In order for this to be vector again we need to autotrace it (this is why we worked at a nice high resolution while in Photoshop). With the PSD selected, go up to the little down triangle beside the Live Trace button and choose “Detailed Illustration” from the list of autotrace presets (this one almost always works the best for me).

Sweet! You probably want to make this thing a lot smaller before you make a brush out of it. So with the selection tool, hold shift and drag inward from a corner to scale it down.
Drag the whole object over to your Brushes panel. A new brushes dialog will pop up. Choose “pattern brush”.

Now you’ll be faced with a few options. The only one I really changed on this screen was the Colorization method. I changed it from the default to “Hue Shift”. This setting means that the brush will take on the stroke color.

Now you’re free to draw away with your new brush! The best way to test it is to hit L to draw a circle shape and use the brush as the stroke. If you don’t see any seams – it worked!

This method applies to all kinds of pattern brushes. If you want to make a chain pattern brush, just draw one. Then export to Photoshop, use the offset filter and fix the seam. Then back to Illustrator for autotracing and brush-making.
Something cool that was not covered in this guide is that pattern brushes have special parts for the beginning, end, and corners of strokes. This is really cool and adds a lot more flexibility. Keep your eye on the Go MediaZine and maybe a future post will cover these parts of a pattern brush.
Happy designing!