Blog
14 Free Scatter Brushes & How-to
I was screen spying on Go Media’s Chris Comella as he was working on a Smashing Pumpkins design in which the dense black typography was exploding shards in every direction. He placed every particle by hand (and it shows). I wondered if scatter brushes could be used to get a similar effect.

Sometimes I get the feeling that Scatter Brushes don’t get enough attention in Illustrator. They are actually a pretty powerful tool, especially if you’re trying to achieve a complicated look that could take awhile to make by hand.

So here are 14 free brushes, but let’s first take a look at the anatomy of a scatter brush. A new Scatter Brush starts with any vector object you think would look cool scattered along a path. For simplicity’s sake, let’s assume this is a circle with a black fill and no stroke. Drag this circle onto the brushes panel and choose “New Scatter Brush” from the available options.

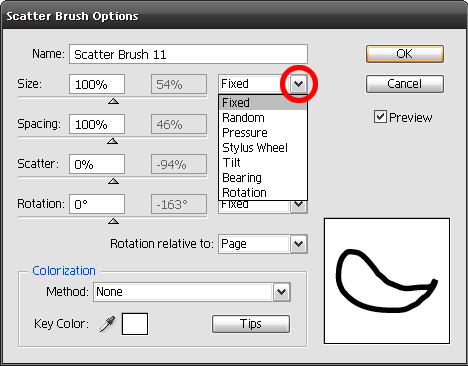
You should now see a window with four major options. When adjusting these options, it is best to have a sample stroke on your artboard and the “preview” box checked so you can immediately see the effects of your changes.
All of these major options have a drop-down menu to the right that selects how the parameter will react. The default setting is “fixed”. The remaining options are Random, Pressure, Stylus Wheel, Tilt, Bearing, and Rotation. A little explanation on these options first.

Parameter Settings
1. Random: Creates a brush that varies randomly within a defined range. Now you’ll see two sliders instead of one, and the brush reacts randomly along the path between that range.
If you don’t have a wacom, then you’re going to have to settle for Random settings for variety. (Also, get your Wacom set-up properly by following this guide) Otherwise, check out all these ways to get some more expression out of your Scatter Brushes:
2. Pressure: Creates a brush that varies in response to how hard you push down with your Wacom. This setting is really only useful with the Size parameter, and can give really confusing results when used with other parameters.
3. Stylus wheel: This one is pretty confusing. From what I understand it changes the diameter of the brush in relation to the stylus wheel on a digital pen. Does anybody have a Wacom with a scroll wheel? Am I missing something? I would just stay away from this setting.
4. Tilt: Creates a brush that varies in response to the angle of tilt between your Wacom and the tablet surface.
5. Bearing: Very cool! This setting is great to use with the rotation parameter, and varies the brush based on where the tip of the brush is pointing.
6. Rotation: Also a good option to use with the Rotation parameter, it varies the brush based on how you are twisting the wacom pen along the ‘z’ axis.
Ok, on to the parameters themselves.
Parameters
1. Size controls the size of objects along the stroke.
2. Spacing controls how much space there is between objects along the path.
3. Scatter controls how much space there is between objects perpendicular to the path.
4. Rotation controls how the objects are oriented relative to the page or the path.
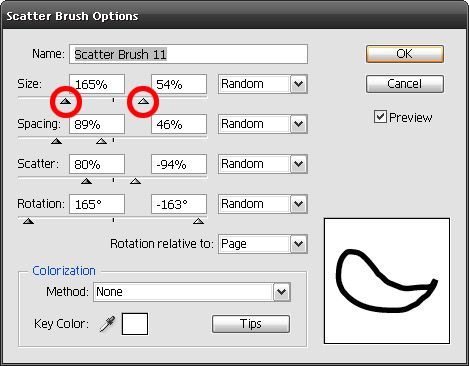
I usually start settings each to random and with ranges similar to the screenshot below. Then I go back and experiment with the pressure and tilt settings for the Wacom.

Okay, let’s get back to creating your Scatter Brush. A good first attempt at getting the settings right is to set all parameters to Random and a medium range. How does that look? The two parameters that I find need the most fine tuning are Size and Spacing. If your scatter brush looks too thin, try moving the range of sizes higher and moving the range of spacing lower.
In the free download there are 14 Scatter Brushes to get you started. One of coolest brushes in the freebie is a splatter brush, which allows you to paint a splatter along a path; that’s a lot of control. You’ll also find circles, shards, sticks, squares, little pills, chunks & petals. Also included is the little particle explosion from the preview image made up entirely of the scatter brushes in the freebie.
Double click the brushes to see each one’s settings. The way I have them is just a starting point – go ahead and customize them to your own style. You might be surprised how different a brush can look with a few changes to those sliders.
When trying to make something crazy with scatter brushes my best advice is to layer, layer, layer. For the preview image I laid down a bed of dark colored brushes, then some white ones on top, then some more dark. I’m sure you’ll come up with something cooler and show it off in our User Showcase.
Good luck!