Blog
Adobe Bridge is iTunes for Designers
Really?
Think about it: What if every time you wanted to jam to your Summer 2001 Playlist you had to re-construct it from your mess of mp3s in a folder called “downloads”? Well, you don’t, because iTunes doesn’t organize your tunes by folder, it organizes them by metadata: artist, album, genre, playlist.
Adobe bridge does the same thing – digital asset management. Basically it’s a supercharged file explorer. Adobe bridge is made to handle every digital file that any Adobe software could create. Besides the basic PSD, AI, EPS and INDD, this also includes RAW Camera files for photographers, Premier files for the video guys, and Audition files for recording engineers. But since this is a graphic design blog, we’re going to focus on managing vector and raster design files.
Why use Adobe Bridge?
Well, if you frequently find yourself hunting around for a design resource you KNOW is somewhere under C:\mystuff\downloads 2007\design stuff\ and then have to open every EPS file to find the right flourish – Adobe Bridge can come to the rescue and speed up your work flow. Especially if you’re designing on a Windows machine, Adobe Bridge will help you spend less time hunting around for the right file, and more time designing.
Note: For Mac users, many of the cooler features of bridge are part of OSX, and where OSX doesn’t cut it, here is a free EPS preview plug-in for quick look.
Pros:
1. Thumbnails and previews of every kind of Adobe file! Vector, PSD, etc
2. Powerful ways to get to your stuff using metadata and smart search
3. Tight Integration with CS3
Cons:
1. Eats RAM for breakfast
2. Teaching the old dog new tricks – to get any real benefit from Adobe Bridge you’re going to have to change your workflow and habits.
What it does (and doesn’t do)
Does:
Adobe Bridge can show thumbnails and previews of every kind of Adobe file – finally you can preview vector files without opening them! Additionally, Bridge reads and writes detailed metadata such as Keywords, Ratings, aspect ratio, file properties and more, has intuitive searching that behaves just like iTunes Smart Playlists. You can even save “Collections” which are essentially playlists of design files built from your keywords and other metadata. Adobe Bridge can also stack and group files, which is useful when you have saved five different variations of a design, or have a group of similar photographs. Adobe Bridge can save a lot of time by batch renaming files. Finally, Adobe Bridge can control and sync color settings across all Adobe CS3 Apps.
Don’t:
Design anything. Nope – you won’t find a pen tool or a marquee selection tool anywhere in Adobe Bridge.
Navigating the UI
Here is Adobe Bridge doing what it does best – helping you do the impossible: browse those EPS and AI files with hi-res previews. Now lets break down the interface.
There are seven panels in Adobe Bridge:
1.Content
2.Favorites
3.Folders
4.Preview
5.Filter*
6.Metadata
7.Keywords
Typically either the Content panel or the preview panel takes up most of the view.
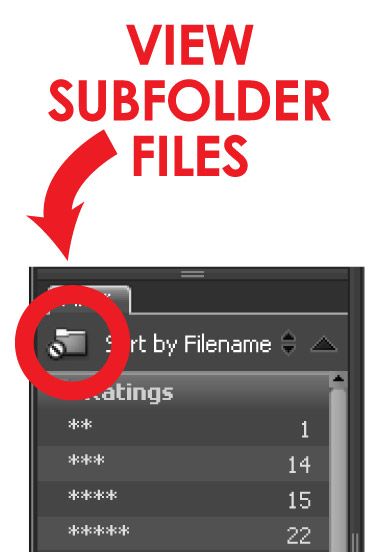
*Hidden here in the filter menu is a tiny, and very useful, button. It flattens the view. So, if you have a folder with subfolders – for example: Stock Vector\ Go Media Stock Vector \Set1,Set2,Set3, etc – then clicking this button will show the contents of all subfolders in one view!
Organizing with Adobe Bridge
Stars
As another of the many comparisons to iTunes, star ratings in Adobe Bridge work just like you’d expect – they rate your design files just like iTunes rates your tunes. You’ve got 6 levels of rating: 0 through 5 stars. You can star files quickly without leaving the keyboard by using ctrl+1-5 while having a file selected. Another cool shortcut is ctrl+ , and ctrl+. to raise and lower the rating of an existing file.
Labels
Labels are similar to stars, except they don’t have a rank and are associated with a specific meaning and a color. You can use Adobe’s default labels or define exactly what you want each one to mean. Labels can be very useful for managing Client folders and designating files as “proof”, “revision” or “final”. You’ve got 5 spaces to create custom labels – go get organizing!
To customize your labels, hit ctrl+K to get to preferences, and then choose “labels” in the side panel.
Once you decide what labels will work best for you, speed up the labeling process by using ctrl+ 6-9 to apply your first 4 new custom labels. Strangely, the last label does not have a shortcut key.
You don’t have to stop at your files when labeling – labels work on folders too! I’ve used this feature to speed up browsing. I can mark a folder as “Final”, and not even have to open it up and examine the AI files inside.
Keywords
Keywords are a really powerful organizational feature inside of Bridge, but it will take a little effort on your part to really get any benefit from them. Keywords are like genres in iTunes since they describe the contents of the selected file with broad categories. They can be anything from “Birthday” to “Grunge” or “Cleveland”. Keywords can be nested in Bridge, making them even more powerful. Check out the screenshot of my keywords panel to see what I mean.
Here’s a trick on how to quickly get your keyword panel set up: stick your cursor in the search box at the bottom and type out your level 1 keywords separated by a semicolon. In my case it would look like this: Color ; Design Ingredients ; Events ; Objects ; People ; Places ; Source ; Style. When you’re done typing hit the plus (+) sign to the right to add your keywords. Use the same process to add sub keywords, only this time hit the button with the plus sign and the arrow.
Keywords are best used in conjunction with the filter panel. At first, the filter panel and the Keyword panel seem so similar that it could be confusing. (The Keyword panel writes keyword metadata to files. The Filter panel well, filters, by the clicked keyword and shows only matching files).
Smart Search
Again, I really like Bridge’s search feature because it feels like familiar old iTunes. Ctrl+F brings up the search box. You can define criteria from any piece of metadata, and then qualifies the search with familiar restraints such as “contains”, “does not contain”, and “starts with”. You can add as many criteria as you like and define how they interact; the search can return a query matching all criteria, or any criteria.
Collections
Collections are Playlists without the head banging. If you have a search that you find yourself doing over and over, just save it as a collection. A collection is a virtual folder that will execute the search when double clicked – pretty cool if you’ve made good use of star ratings, labels and keywords!
Stacks
Stacks are folders on the go – or for the sake of maintaining the analogy – albums. You can right click any number of similar files and choose Stack > Group as Stack. You can see what stacks look like in the screen shot – and notice the number in the upper left hand corner showing how many files are in the stack.
Tooling around in Bridge
Live Trace multiple files at once right from bridge
A useful tool, especially if you need to select from a bunch of different sketches to live trace at once. The only downside is that Illustrator needs to be running – but if you’re like us it’s always running in the background anyway.
Here’s how to do it:
Select the raster or PSD file that you want to live trace
Point to Tools > Illustrator > Live Trace
Place design ingredients into Photoshop, Illustrator, or InDesign right from bridge.
Select files that you want to drop into your design and point to File > Place. It’s an easy – and fast – way to put Flourishes and stock images into a file in a few clicks. Bridge will handle any number of files in different formats.

Syncing Color Management Across all Adobe Apps
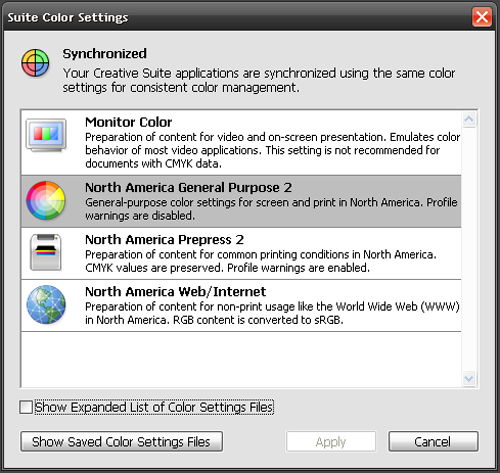
Point to Edit > Creative Suite Color Settings. Select a color setting from the list, and click Apply. Now you can be sure that you’ve got the same settings in each program.
Bonus Round
Organizing and Rating Color Profiles
Here is a little Easter egg to wrap up the post: if you’ve spent any time on Adobe Kuler and downloaded a few color profiles, you might just find this tip handy. Adobe Bridge can preview color profiles and organize them using star ratings, labels, and keywords. Finally a way to find “Granny Smith Apple” when I need it!
Well, thanks for reading and I hope you found a reason to dust off Bridge for a spin. If you have any questions or frustrations about Bridge, let me know in the comments and I’ll try to find the answer! Of course if you have tips of your own, please, do share!


