Blog
Hot Rod Monster Design Process
Hi, Philip Hepler here from 316 Graphics. A few weeks prior to writing this, Jeff Finley and I discussed possibilities for the next Arsenal vector pack. We decided to concept some hot rod elements which later turned into a vector set inspired by the art style of Ed “Big Daddy” Roth. Here’s the design process for this fun vector pack.
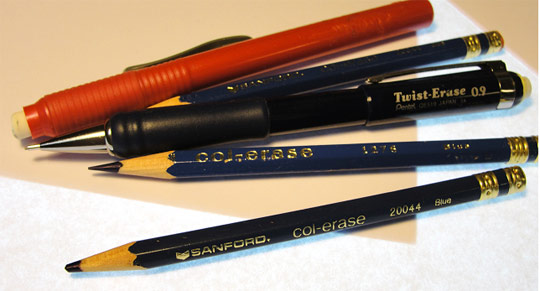
For the record, here’s my list of tools I’m working with:
- Plain copy paper
- “col-erase” blue pencils
- Mechanical pencil (.9)
- Light table
- Intuos Wacom tablet
- Adobe Illustrator CS5
- Inexpensive scanner/copier/printer
- 27” iMac
FIRST THINGS FIRST
Since we wanted to be inspired the art style of Ed Roth I did a Google image search for inspiration. I also checked out the official Ed Roth web site ratfink.com. Rat Fink was an anti-Mickey mascot that represented Roth’s attitude and style in the 50’s and 60’s. I always get sucked in to learning more about the artist, and in this case, ended up spending some time checking out his crazy car creations and wild monster hot rod themed illustrations. I ended up with four or five key examples of his work which I printed out and pasted above my drawing table for inspiration. Next I did a little brainstorming and made a list of possible elements for this theme. Some of the elements on my list were chrome pipes, flames, smoking tires, gear shifters, flying eyeballs, and Hot Rod Monsters of course!

PUTTING PENCIL TO PAPER
Next I took the strongest elements on my list and did a rough sketch of each, constantly referencing my inspiration images and imagining how those elements should look in this art style. I’m in the habit of using col-erase pencils to rough sketch my ideas on plain copy paper. The light blue lead of these pencils help me stay loose and general with my sketch so I can get the basic look right and leave the details for the next step. Then I draw over the blue sketch with a mechanical pencil to refine it more and add more detail.
I also use a light box and a fresh sheet of paper to refine and clean up my sketch even further if necessary. With my rough sketch ideas on paper I scanned and saved them as a pdf file and sent them off to Jeff to see what he thought of the elements so far. He replied back quickly that he was digg’n the elements, but also had a great suggestion to make multiple monster heads and facial features as separate elements. This would allow users to make their own Hot Rod Monster “Mr. Potato Head” style with mix and match parts. What a great idea! Now I was really getting excited.

WHAT’S YOUR VECTOR VICTOR?
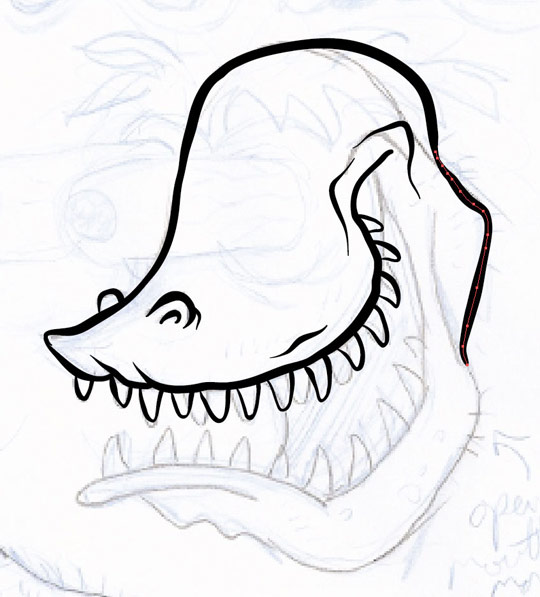
With Jeff’s feedback and suggestions I did a few more rough element sketches and decided it was time to color them up in Illustrator. I scanned my revised sketches and placed each scan into my Illustrator file on a background template layer. For the more organic shapes of the monster features I used the brush tool with a 3 pt. round calligraphy brush and set the diameter setting to Pressure with a Variation of 3 pt. For the longer smooth strokes and more mechanical elements I used a custom art brush with rounded ends. Using my trusty Wacom tablet, I traced my sketches, trying to emulate the hand inked look of Roth’s illustrations.

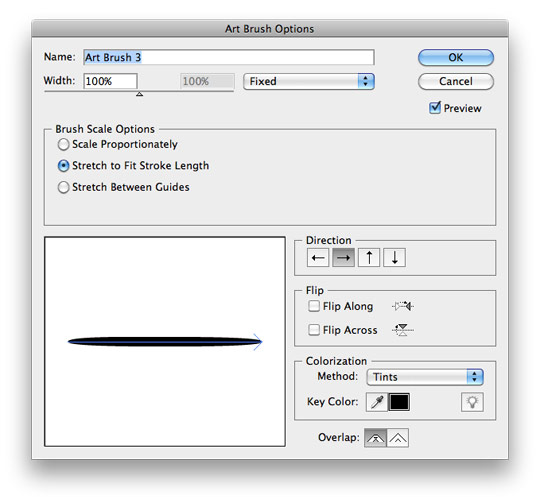
Tip: instead of making multiple brushes of different widths for your graphic, you can adjust the thickness of individual brush stroke paths by increasing the stroke weight in the stroke palette. This is a quick way to get variable stroke weights in your graphic without having to duplicate and modify multiple brushes in your brush palette. See the video link below if I’ve lost you.
I also used the Blob Brush tool to fill in larger areas like the monster’s mouths and some quick irregular shapes and details. Feeling good about how the elements looked, I saved another pdf of the vector elements, sent it to Jeff for review, and hoped for the best.
WRAPPING IT UP
Thankfully Jeff loved the elements and how the vector pack turned out! But before I could send him the files I needed to clean up the elements and make everything nice and neat. First I saved a new copy of the file and then selected each element and expanded the appearance of the brush stokes to create objects (Object-Expand Appearance). With all the brush strokes now converted to black filled objects, I used the Unite function to make the objects one shape (Pathfinder window-Unite). For vector pack art like this, uniting the artwork as one shape makes cleaner, neater elements to work with. Just in case I need to go back and adjust or modify something later, I can always go back to my previous file where my brush strokes are still “live” and editable.

Live brush strokes
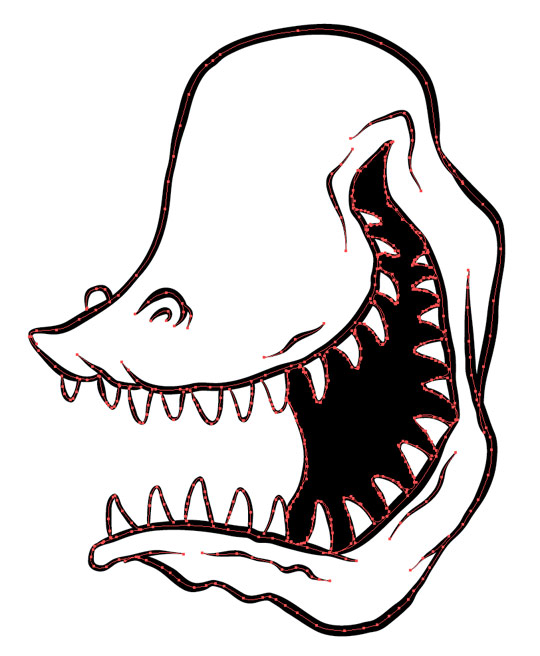
Brush strokes expanded to objects

Expanded objects united as one composite path.
GOT ALL THAT?
Here’s a video of how one of the elements was drawn in Illustrator, the brush settings I used, and the method to my madness!
I would like to thank Jeff Finley and Go Media for the opportunity to work on this latest vector pack release. It was a lot of fun to draw and I hope it will come in handy for one of your future projects!
This post was written by:
Philip Hepler
I’m the man behind the curtain at 316 Graphics, a full time freelance graphic art studio specializing in apparel graphics. The emphasis of my work is on hand drawn illustrations and the ability to adapt to a multitude of art styles and looks. Check out 316Graphics.com to view my portfolio, inspiration section, and freebie downloads. I live and work in Thomasville, NC (home of the big chair), love classic cars, and drink a gallon of southern sweet tea every day.