Blog
Tutorial: Animating Birds with After Effects
After Effects Tutorial from Cleveland Graphics firm, Go Media
Introduction:
GoMedia_Vector_Freebie_Animating-Birds
Like a lot of motion designers I spend many hours trying to accomplish complex animations in a short amount of time, while attempting to optimize my workflow within After Effects, Photoshop, and Illustrator. This tutorial utilizes Trapcodes Particular, which is one of After Effects more popular 3rd party plugins. Creating an animation like a flock of birds is very versatile and is a great filler animation which can add a lot of style to a piece. You can also adapt this technique to create other flying creatures…. perhaps a flying skull with flapping wings?
Here’s a short clip of the Go Media promo reel that utilizes the bird animation that you will learn to create. (To view the entire promo reel, click here and scroll down to the bottom of the tutorial).
[kml_flashembed movie="http://www.youtube.com/v/LdC5vVI6VDg" width="425" height="350" wmode="transparent" /]
What you’ll need:
A working knowledge of Adobe After Effects
Trapcode’s Particular Plugin
Adobe Illustrator.
So what we are going to do is create a flock of birds in After Effects using Trapcodes plugin, Particular.
1. Open up After Effects
Create a composition called “bird.” Set your composition settings to something similar to this:

2. Set up your Wing Layers
Once you have your composition set up, create two new solid white layers both about 300×300 pixels. Name one of them “right wing” and the other “left wing.”
3. Create your Bird Shape in Illustrator.
We need to create our wings which will be animated in After Effects (AE). All you need is a silhouette of a bird shape. So you can draw this yourself in Illustrator. Fortunately, Go Media has already done the job in their “Flock of Birds” vector pack. So once you have your bird created, simply click and select the shape like so:

4. Paste the shape into After Effects as a Mask
So, with your bird path selected in Illustrator go to Edit>copy. Now, go back to your opened after effects project, select the “right wing” layer and Paste in the path by either hitting “Comand/Control+V” or by going to Edit>paste. Also paste the path into the “left wing” layer as well.
5. Remove half of the bird and line up the anchor point
Now you have the bird shape copied into After Effects as a mask. You can turn off the “left wing” layer for now. Now you will have to delete some points from your mask because we only want half of the bird on each of our wing layers. Be aware of where you put the mask shape in relation to the solid layers’ anchor point.
You will want to to have the center of the bird’s body to be right on top of the anchor point. An easy way not to screw this up is to just move the mask, NOT the layer. Select the mask and hit “Command/Control+T” to free transform the mask around the layer. Notice on the images below where the anchor point is.


So once you have the right half of the bird assembled, you’ll want to turn on the “left wing” layer and do the same to that layer. Delete some points and align the mask up so it completes the bird shape. And remember to move the mask NOT the layer. We want the anchor points to practically be in the same place on both the layers. Once you are done you should have something like this. Notice the anchor points.

6. Turn both layers into 3D Layers
Now for the fun part! Turn both “wing” layers into 3D layers by clicking the switch/button that looks like a 3D box.

7. Expressions instead of Keyframes
Now instead of keyframing the wing layers to make them appear like they are flapping, we are going to add in some expressions. This isn’t a tutorial on expressions so I won’t really get into how they work. In a nutshell, expressions use math and scripts to animate certain properties of a layer. And that’s exactly what we are going to do – use expressions to animate our wings. Easy huh?
So, twirl down the transform properties of the “right wing” layer. Create an expression on the “Y rotation.” To do this “option/alt click” on the stopwatch icon next to “Y rotation” property. You should see something like this:

Now, you’ll want to replace the text in the expression to read: 60*Math.sin(15*time)
On the “left wing” layer create an expression on the Y rotation as well. Except this one will be: -thisComp.layer(“right wing”).rotationY
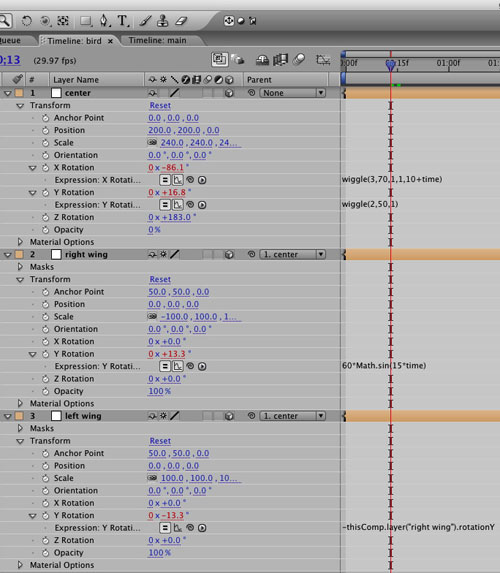
Your layers should now look like this:

8. Add in a Null Object to control movement
Now that you’ve added those expressions, your bird should at least be flapping. What we are going to do now is add in a null object layer to control the entire movement of the bird.
Go to layer>new and create a new Null Object. Rename the null object to “center”. Turn this into a 3D layer by clicking the button that looks like a 3D box. Now parent your other two wing layers to this new null object layer. If you do not see the Parent column you may have to right click on “layer name” and select the column from the list.


Once you parented the layers to the “center” layer, we will need to change some of the parameters of the “center” layer and add some more expressions.
9. More Expressions
Twirl down the transform properties of the “center” layer and make sure the rotation parameters are as follows:
X Rotation = -84
Y Rotation = 0
Z Rotation = 183 approximate
Now, create an expression on the “X Rotation” that reads: wiggle(3,70,1,1,10+time)
Create an expression on the “Y Rotation” that reads: wiggle(2,50,1)
Now all of your layers and bird comp should look something like this.
Once you’ve got your comp and layers looking like this.. and your bird is flapping away in 3D space, we’ll need to create a new comp which we’ll actually have the Particular emitting our flapping bird.
10. Use the Particular Plugin
So, create a new composition like this one and make sure that the background of this composition is a grayish color. We don’t want it to be black or white because our birds will be one of those colors. You can change the background color of a composition by hitting “command/control + shift + B”. Or go to Composition>Background Color.

Create a new solid layer and name it particles.
Create a new solid layer and name it background, turn this layer off for now.
Create a new camera.
Now drag the bird composition from the project window into the “main” composition that we just made. Turn off the pre-composed bird layer by hitting the eye icon.
Make sure all of your layers are the length of the composition or at least as long as you want them in frame. Although the bird comp layer is turned off, in order to see the custom particles that we will be emitting, the bird comp layer needs to “in frame” in the timeline. Your “main” composition should look like this now.

11. Apply the effect to your “particles” layer
Now we are going to apply the Particular effect to the “particles” layer and start emitting our custom particles. Select the “particles” layer and go to Effect>Trapcode>Particular. Now that the effect is applied, twirl down the parameters for the effect. You should see 7 main categories and should look like this:

12. Customize your settings
Twirl down the “particle” tab and lets customize our system. You will want the “particle type” to be set to “Custom Colorize.” When you select that option the grayed out “custom” twirl down should be available now. Twirl down the “custom” tab and have the layer set to “4. Bird” (the pre-comp bird layer). The time sampling should be on “Random-loop” and the subframe sampling should be set to “off.” Because our particle type is set to “custom colorize,” you will be able to change the color of the birds just by simply choosing the color in the particle tab. Your particle tab should now look like this.

Now lets twirl down the “Emitter” tab. Here is what your parameters should look like for this section:
Emitter type = sphere
layer = none
layer sampling = current time
layer RGB usage = RGB – particle
Position XY = 997 , 240 approximate
Position Z = 275 approximate
Direction = directional
Drection Spread = 4
X rotation = 0
Y rotation = 245 approx.
Z rotation = 0
Velocity = 280 approx.
Velocity random = 20
Velocity from motion = 20
Emitter size X = 620
Emitter size Y = 90
Emitter size Z = 145
Your emitter parameters should look like this :

13. Modify the “Physics” of your particles (birds)
Now lets take a look at the “physics” tab of this effect. This is where we can determine wind resistance, wind direction, and turbulence for our flock of birds. You will want the “physics Model” to be set to “Air”. Twirl down the “Air” tab. Everything should be set to “zero” except for “Spin Frequency” which can be set to “0.5”. Twirl down the “Turbulence Field” tab. The more you “Affect Position,” the more irregular the birds flight will seem. The setting I use are as follows:
Affect Size = 4
Affect Position = 225
Time Before Affect = 0
Scale = 2
Complexity = 3
Octave Multiplier = .05
Octave Scale = 1.5
Evolution Speed =
Move with Wind = 80
Your Physics parameters should look like this:

14. Motion Blur
Almost finished now. One last section of the Particular effects that we need to go over is the “motion blur.” I generally have this set to “comp settings” but you can experiment with this on your own. I actually think that these birds look best with no blur on them at all. I think the motion blur actually takes away a lot of the detail in these birds. And I think if you’re putting on a motion blur you do not need to be using the Go Media Vector pack shape. You could then just use a simple shape that you made right in After Effects with the pen tool. My motion blur settings look like this:

15. Tweak your camera settings
You also want to make sure that your camera is positioned in a place where you’ll be able to see these particles. You should have your z depth somewhere around “-250” My camera settings look like this:

16. Tweak the amount of birds
Now we are going to make 2 keyframes in the emitter tab of the Paricular effect. So at about 7 frames on your timeline keyframe the “Particles / sec” to be about 100. Then move to the 9th frame and keyframe the particles / sec to be “zero”. This will let out no more than 100 particles – or in our case, a flock of birds. Your comp should now look like this :

17. Add a simple background
The last thing we need to do is add in a background. So turn on the “background” layer that had you turn off. Select the layer and go to Effect>generate>ramp. Now within the ramp effect choose 2 nice sky blue colors and create a nice sky type gradient. Now that you’ve done that you are finished and should have created a beautiful flock of birds.
Here is the entire Go Media show reel that features use of the bird animation throughout:
Go Media Motion Reel 2009 from Go Media on Vimeo.