Blog
Create a Killer Band Site in Drupal – Part 4 – Theming Drupal
This tutorial is another special series written guest author Sean Hodge from aiburn.com and Connection Cube. He is an expert in Drupal, which I am totally not familar with. He intrigued me when he told me that the majority of the bands on Sony’s record label are powered by Drupal. Drupal is basically an open source CMS, and I was interested in learning more about it. So that’s why he’s writing this tutorial for us. You can learn along with me!
Read the introduction – What’s Drupal and why?
Read Part 1 – Design it Illustrator
Read Part 2 – Slicing it Illustrator
Read Part 3 – XHTML
Read Part 5 -Drupal Admin
Introduction
In our last tutorial we coded our XHTML and Cascading Style Sheets. Now we are going to turn that code into a Druapl Theme.
Setup Drupal
First download a copy of the final Goband Theme files. That way you’ll have it to refer to as you work through this tutorial.
Next you want to download the most recent version of Drupal 5. Go to Drupal.org and look for the link on the right of the screen. Then make sure you get Drupal installed. Lullabot has a good video on Installing Drupal 5. You will need either a local test environment setup or a host that is Drupal compatible. I’m on a Mac and I use MAMP for local testing. Lullabot has a good video for setting up a Local Mamp Test Server on your Mac. You could certainly develop with Drupal and have a different setup. Lullabot has more resources for setting up a local test site on other computer types. Check out their Videos section. I keep mentioning Lullabot. They are well known in the Drupal community for producing really good websites for big companies, offering seminars, and running a Drupal podcast. They have some great Drupal resources.
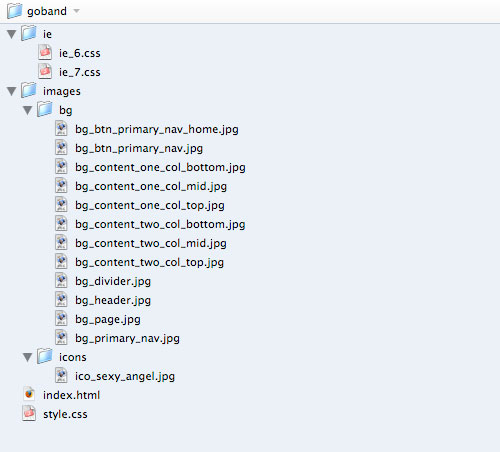
Once you have Drupal installed rename your Drupal install folder to your project name. In this case its named goband. The image below has invisible files shown, as there are important files like the .htaccess file to be aware of. For the rest of this tutorial I’ll have invisible files turned off though.

Create Your Theme Directory
There are a multitude of template languages that Drupal can work with. The most common is PHPTemplate that uses Drupal’s own theme engine. There are two places to put your Drupal theme. The most obvious is in the themes folder. That works fine and will make your theme accessible to your website. Now if you want to have this theme power multiple sites then you can put it in sites > all > themes. You may need to create the themes folder inside the all directory. I’ve grown accustomed to using the second multi-site option.
So take your folder from last week that has your XHTML, CSS, and image files and copy it over to sites > all > themes. Pick a name for this theme folder. I chose goband.
Next move the files folder into the root Drupal install directory. When you install Drupal it will prompt you to create this folder. If you did that then just replace it.
At this beginning stage our theme folder should look like the image below. The only change so far is we have moved out the files folder
Set Up Our Basic Theme Files
Rename our index.html file to page.tpl.php. Then create a new file called template.php. Just leave it blank for now. There are more theme files we could create to customize Drupal, but we’ll keep it relatively simple. I will show you an example of how to do more advanced theming though with the Search area later in this tutorial.
Next we have a couple of images. In the backend of Drupal there is a page where you choose your site’s theme. A visual example of the site is needed there. I used a selection from a screenshot of the site. Its width is 150px and its height is 100px. The image needs to be named screenshot.png for Drupal to recognize it. Its shown below bottom left. Then I made a favicon thats taken from ico_sexy_angel.jpg. I use Dynamic Drive’s FavIcon Generator. You can see the favicon in use bottom right. Drop the favicon right into your theme folder and name it favicon.ico.

Our basic theme files are now in place. Your theme folder should now look like the image below.

Some Resources for Theming
Now that we have our files setup we can work with some code on our main theme page page.tpl.php. We will transform our html code into a working Drupal php file. Its not as scary as it sounds.
The easiest way to do this is to copy and paste code from existing themes. I tend to reuse code from other projects I’ve worked on. You can also take a look at any of the Drupal.org freely available Themes. Being able to look at other’s source code is the beauty of Open Source projects. There is also a good theming overview on Drupal: Theme Developer’s Guide. A truly awesome resource is a freely available chapter from the Pro Drupal Development book: Chapter 8 – The Theme System
A good theme to take a look at when your getting started is called Zen. It was built for the purpose of learning how to create Drupal themes. Go ahead and download the Zen Theme. We’ll be opening it up and looking at its source code.
Drupalizing Our Head Section
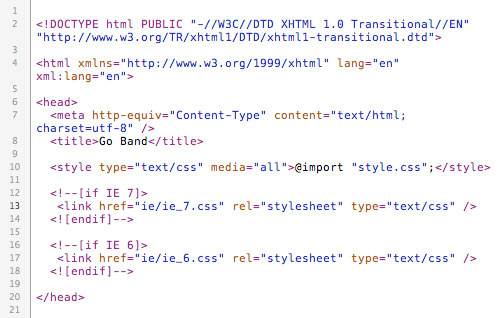
Currently our head section is plain HTML and looks like the image below.
To see how this section looks in the Zen theme view the image below.

Now copy and paste from Zen. Where our theme differs just copy what I have below. Our head section looks almost identical to the Zen theme. All we are doing here is replacing some links with Drupal variables and some minor php. This way drupal can create everything dynamically. Each page title can be made on the fly for example. Here is a link to the variables available for page.tpl.php: Available Variables.
The cool thing is that for most sites this section will look identical. Zen differs a little here as it has some additional features with sub themes that makes its head section a little special. Modify the code until you get the results shown below.

Keep in mind that we are linking to our existing stylesheets in our Head section. When we turn on this theme in our next tutorial it will read our existing stylesheets. Drupal does have some default styles that can effect your stylesheets. So, you might have to make a few changes when you go into Drupal from the CSS of our previous tutorial. But overall the path from XHML/CSS to a Drupal theme is smooth.
Theming Our Body Section
First of all you can erase all the content from your file. We have a copy of our HTML file saved. We’ll use that in our next tutorial when we set up Drupal. So, we are only concerned with the structure of the HTML. We don’t need any of the paragraph content for example.
Let’s Start with Our Page and Content Wrappers
Any dynamic Drupal theme will have some way of detecting how many columns are present and a way to target them through the CSS. Zen uses a more complicated way of doing this. It does give it the benefit of being highly configurable. But we are going to keep things simple in this tutorial. I found some simple php code that can be used for this from another theme. Below is our current HTML for our page wrappers.

Replace that with the code below. What it does is tell Drupal that if the right sidebar is present to display a class of two_column onto our page div.

Here is what the opening of our Content Wrappers looks like. They are located inside of the Page Wrappers.

With this code in place we can target items on the page separately based on wether one or two columns are present. So we can serve up a different background to our Content Wrappers. Below is the related CSS. When targeting the two column view we get the class next to the Page id from the code we inserted above.

Theming Our Top Section
For the Top section of our HTML file we used some default outputted Drupal code for the Search area. We are going to replace that. So, the code will shrink significantly here when replacing our HTML with PHP and Drupal Variables. Below is our HTML.

Lets review the code we are replacing it with. The Top Nav gets replaced with a php if statement. This kind of statement is commonly used for regions. It checks to see if that region is being used and if so it will display that region. We’ll review declaring regions when we discuss our template.php file a little later in this tutorial. The Search HTML is being replaced with a Drupal Variable. When Search is turned on in Drupal it will automatically show up there.

Theming Our Header Section
There isn’t much to the Header section. We are not changing the HTML code much. We just place some theme code in here in case we want to assign a logo to it later on. As its built right now you can’t click on the logo to go Home. Having a logo variable declared here allows us the option to add that later if we want to. The Zen theme’s logo code is almost the same as what we are using for our theme shown below.

Theming Our Primary Navigation Section
Our HTML code for the Primary Navigation is below.

We replace our HTML links with another if statement. There is more than one variable option to use to display your Primary Navigation. The one we are using below outputs some classes that we’ve used in our stylesheet. The First class is the unique one we need to get our home button to look right. And the code below will output that. Also, notice I changed the ul for the primary_nav id below to a div. Its a necessary update to the code after I did some testing.

Theming Our Main Content Section
We replace our Main div with the code below. You’ll see there is a real similarity to what we’ve done in previous sections. We are replacing our content with template variables and in some cases if statements.
The placement of these variables will dictate the order in which items will appear within our Main content. The Mission statement is something I rarely use on a site, but its here in case you want to have a site mission statement. Content Top is one of the regions we’ll be setting up when we discuss the template.php file. The Title is the Content’s Title. That’s straight forward. Tabs are part of our backend interface. Messages and Help print out based on user actions. And then lastly our Content will be output below all these elements. When we make some content in the next tutorial this is where it will output.

Theming Our Right Sidebar
Where going to replace the content in our sidebar with some more template variables and wrap the whole thing in a simple if statement. The cool thing about if statements is that you don’t have to be a programmer to understand how they work. Its really straight forward. It just means if this is true then keep reading the rest of this code inside the statement. When the if clause is not met it will not read anything inside of it, but rather pass it by.
Once it gets to a print command then that means output that code. It will only read that command though if the surrounding if clause is met. When you have either Secondary Navigation or content assigned to the sidebar right region then the first if statement will be met. The Secondary Navigation is wrapped in an if statement of its own own. On pages that don’t have Secondary Navigation the code inclosed in that statement won’t show up at all.
Below is our Right Sidebar code.

Theming Our Footer
Below is our Footer html. In our next tutorial we will input this into a field in the administration area of Drupal.

The Footer Message variable will output this field in the Drupal admin panel.

Closure
This is what Drupal has to say about the Closure variable: “Needs to be displayed at the bottom of the page, for any dynamic javascript that needs to be called once the page has already been displayed.” I’m not going to argue with that. I just make sure to remember to put it in my themes. You can see it below as well as our closing HTML tags. That wraps up our page.tpl.php file. Lets move on.

The Drupal Ninja’s Weapon of Choice
Template.php is where the magic happens. This is where you put your dynamic code. We’ll start off by reviewing our regions code. This is really simple to do and needed on just about any theme your going to make. Below is the region code for this template within the Template.php file. We open up the file with an opening php tag. We don’t want to close it though at the end of our file. That’s just how Drupal works. You use the same code as below to add any regions to your theme. This same code can be copied and placed into any theme you make. You can then add more regions using the same style of formatting. The left side is the assigned name (example: top_nav) and the right side is the human readable name (example: top nav). Drupal will need to read the left side for region placement. The right side is just for the user to see an easy to read name in the admin interface.

After declaring your regions you can then target them in page.tpl.php. For example we did this in our Top Section. See the code in the image below: <?php print $top_nav; ?>. Use this convention to tell Drupal where to place a region in your theme. In our next tutorial we’ll review how to target these regions in the Blocks area of Drupal’s administration interface.
Theming the Search Form
First we want to finish up our template.php file. We’re going to add some dynamic code that will allow us to create a separate file to theme the Search Form. This is needed for our theme its also an advanced example of Drupal theming. I found the solution on this page: Customizing the search forms. It explains how to use it and you can copy and paste the code. The code is shown below.

Next we create a new file named search-theme-form.tpl.php and place the code below. This code allows us to add our own image as the submit button of the search form. I copied most of the code below from somewhere and then just tweaked it. You can see its mostly HTML.

Theming Drupal’s Administration Interface
Walking you through how to theme the Drupal administration interface is beyond the scope of this tutorial. Though there is some code that does that included in the theme files. You’ll see it in the last section of our updated style.css file. Below is a preview of what we’ll be working with next week.

Also, keep in mind that with client projects and even your own you’ll have to account for the time it will take to theme the administration interface versus using a separate theme for the administration area.
I often use one of the theme’s Garland that is included with Drupal’s download for the administration area on client sites. For most clients it helps them to know when they are in the administration area and when they are in the site by using this strategy. Garland also has a cool color switcher that you can use. This means you don’t have to write any code for the administration theme if you use Garland. Just change the color and your done. Its great that Drupal gives you the option to use the same theme or a separate theme for your Administration area.
Building Up Your Library of Drupal Theme Snippets
After you’ve looked at more Free Drupal Themes and as you make more of your own Drupal themes you’ll start to build up a library of php. Its great to have a snippet you can grab when your project requires a specific functionality. Drupal has a directory where can look up Theme Snippets or search across Drupal for code as well. Sometimes code resides off of Drupal on blogs for example. So don’t rule out a good google search.

Keep in mind Eighty percent of theming in Drupal can be done by anyone with a knowledge of HTML and CSS. Depending on the project usually another fifteen percent of what you need can be found easily by searching Drupal or looking at other themes. The last five percent will require help. That may mean hiring someone. If your not a php programmer and you can’t find code to do what you need in your theme you can always Hire a Drupal Programmer for those specific occasions. Or you can try posting a request for help to the Drupal Forums. You may also find that some existing Drupal Modules can fulfill your needs rather than trying to hard code something into your theme.
Conclusion
We covered a lot of ground in this tutorial as well. You’ll learn after getting some more experience with Drupal theming that this theme was kept basic to keep the scope narrow enough to cover in a tutorial. There is so much more you can do with Drupal themes. In the next part of this series we’ll be looking at the Drupal administration interface, importing our content, and getting our Goband site setup. Let me know if you have any theming questions. Also, start exploring the resources I mentioned in this tutorial. They have been really helpful to me.
Read the introduction – What’s Drupal and why?
Read Part 1 – Design it Illustrator
Read Part 2 – Slicing it Illustrator
Read Part 3 – XHTML
Read Part 5 -Drupal Admin