Blog
How to Design Your Own Custom Hoodie
We know how much you guys and gals love a good tutorial! We just launched our new Hoodie Templates and they are amazing. I decided to sit down and design a hoodie and to write a tutorial in celebration.
You should know right from the start that there is a lot to digest here. This is a long tutorial and will demonstrate some advanced skills. Along the way you’ll not only learn how to create a detailed illustration, but also how to create professional hoodie mock ups with Go Media’s Hoodie Design Pack.
Here’s what we’re gonna make:
IN THIS POST
1. Creating a Custom Hoodie Design
2. Mocking it up
3. More mockup examples
4. Hoodie Design Pack feature tour
WHAT YOU’LL NEED
1. Something to sketch with
2. Scanner
3. Adobe Photoshop
4. Wacom Tablet
5. Go Media Hoodie Design Pack
6. A cup of coffee
CREATING YOUR CUSTOM HOODIE DESIGN
We’re making a super custom illustrated hoodie design, right? The best place to start with a project like this is the sketchbook. For some inspiration check out my colleague’s sketchbook. You should start sketching something that you’re really interested in. Personally, I love tentacle looking things and couldn’t get the word “bogus” out of my head…so a bogus octopus was born. I did this one really quick (about 15 minutes) but your mileage may vary.
I scanned the rough image from my sketchbook into Photoshop and busted out my handy dandy Wacom tablet.

I set up my file for 25” by 20” at 300 dpi in CMYK, then pressed ctrl+alt+shift+n to create a new layer and began to draw over my sketch.

We always get questions about what kind of brush settings we use when drawing with a Wacom. These are the exact settings I used.


Remember how quickly I sketched the octopus? It’s just a starting point, because as you can see I don’t always stick to the original sketch. As I am working I just let the drawing dictate where things should lie.
If you aren’t comfortable with this, you can just add all the detail that you want to your initial sketch and try to follow it a little more closely inside Photoshop.

In this next shot you can see how the drawing is growing beyond the boundaries of the original sketch. It’s starting to shape up! Take a look at your own design right now and start to revise it until you’re happy. We’ll be moving on to adding details in just a minute.

After I had my rough outline at a satisfactory point, I then went back through the drawing and added detail to make the little guy come to life a bit more. For me, it usually just involves thickening up outlines to simulate depth and adding texture to the rough outline. In this particular image, it mostly involved making wrinkles and adding splashes of ooze.
These next few shots are really important. As Bill expertly explained in his “How to Become a Master Designer” series, one of the secrets to depth is varying line weight. Take note of how this looks and try to add a little depth to your own design.

Okay! Looks like all my linework is complete. Now let’s bring it to life with some color.

Adding Color
Once I was finished with the outline of the drawing, I went back and began to add color. I started by laying down the base color of the octopus. For this drawing I chose a nice bluish green color.
Here’s how I set up my new Octopus layer:
- Use the magic wand to select all the white area around your black outline and all the other spots where you don’t want the octopus color to be.
- Then use select inverse and create a new layer.
- Use the bucket tool and fill the new layer with the color you chose.

Then I selected a slightly darker hue and added shadows to create even more depth and dimension.

I followed the creases and folds of the tentacles with my Wacom pen keeping in mind which parts I want to pop forward and which I want to recede into the background. Always try to think of where the light would be hitting the different areas.

I wanted the octopus to look really wet and shiny, so I added heavy white highlights throughout the illustration to simulate a glossy surface. Again, just follow the creases and folds keeping in mind how the light would hit the various parts. Also keep your Wacom pen strokes somewhat loose and free flowing.


I then chose other colors that complimented the design and I used them to add the final details to the octopus. FYI: I always keep my colors on separate layers. It makes it much easier to edit them without having to destroy the whole drawing if you decide to change something.

For the background of the illustration, I created a free form splatter shape that echoed the shapes of the ooze splatters. I duplicated the shape and used a bitmap to create a halftone image. I then used hue shift to change the color to a purple hue.


The final illustration looks a little something like this…

Making the Repeating Pattern
I really liked the way the tentacle/intestine shapes were looking so I decided to make a repeating pattern from them to use as a background texture/all over print.
To begin with, I created a file at 1800 x 1800 pixels. I then copied portions of my black outline layer from the octopus illustration into the new file.

After I had arranged the tentacles into a design I was satisfied with, I used the offset filter to make the pattern repeat. I did this by offsetting the image by half of each of my dimensions, so 900 pixels in width and 900 pixels in length. You will notice at this stage there is a noticeable area in the center where the lines are crazy and don’t match up – don’t freak out – we’re gonna fix this.

So, I erased all the weird seams and began to re-connect the tentacles with my Wacom Pen. Go back and redraw, erase, and repeat. There are a lot of lines to clean up, but the most important thing is that you should not change any of the lines on the outer edge of your design or your pattern will not repeat correctly.

Once you get it to a point where you think everything looks good, double check to make sure the pattern aligns correctly in all directions. If it does, congratulations, you just made a repeating pattern…not so hard, huh?
MOCKING IT UP
Now if a client asked for a hoodie design – she might not be too impressed if I show her just the flat illustration. She asked for a HOODIE, so that’s what we’re going to give her. Enter the hoodie templates.

I begin by dragging my artwork onto the “whole hoodie” layer to size it and get it positioned where I want it. Once you get it where you want, the joy of the hoodie template comes into play. The design already looks pretty darn real because it’s automatically shaded by the ‘Shadows’ & ‘Highlights’ layers.
For this design I only want the print to appear on the front and the pockets of the hoodie. However, if you want some custom pockets or cuffs – it’s really easy. Adam Wagner has painstakingly masked off the various parts of the hoodie at nearly every seam, so you can do some really custom things with the design.
Anyway, for my particular design, I opened the folders for the “Chest” and “Pocket” Layers and pasted the design onto the “Left Chest”,” Right Chest”, “Left Pocket” and “Right Pocket” Layers.

Now that I have my design in place, let’s move on to coloring the hoodie. I am a huge fan of reversible hoodies (two looks for one price baby!), so we’re to mock this up as one.
I began with the outside color of the hoody. I’m on a big purple kick right now so I am going with a vibrant dark purple color. I selected the folder named “Colors” and I use hue shift to adjust one of the color layers until the hoody is the right color of purple.

On the inside, I used a green that is similar to the green of the ooze in the design. I sampled the green from the ooze with the eyedropper tool and then filled all three of the “liner fill” layers with the fill bucket tool.

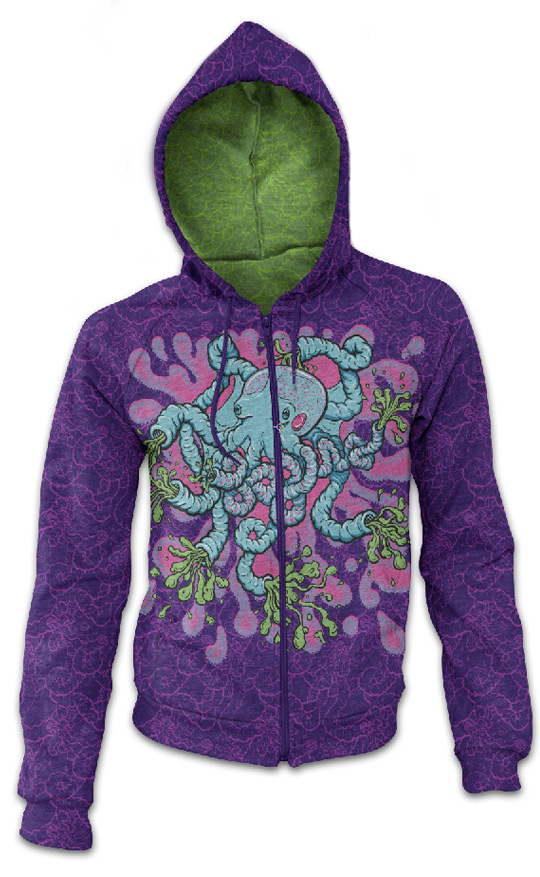
The last thing I did was add the seamless pattern to the whole hoodie. For the outside I gave the pattern a light purple color, and for the liner I gave it a light green color. Presto – done.

Here’s the final design and hoodie mock. Phew – we made it! If all of this was a bit difficult for you, give it time & keep reading. I’m going to show you some really quick shortcuts to get you started in the next couple of sections.

MORE MOCK UP EXAMPLES
I’m pretty happy with the final result, but let’s take a look at what the design would look like on a couple of different hoodies. I really like the way this next one shows the inside of the liner. Gotta love reversible hoodies.

Here’s one more in a standard flat view.

HOODIE DESIGN PACK FEATURE TOUR
Alright. This post is getting kind of long, but I really want to explain the Hoodie Design Pack a bit more. There’s a ton of included treats & functionality. Let’s see what’s under the hood.
1. The Templates
 Ok, so here is the meat & potatoes of the design pack. It includes 10 Hoodie templates in PSD format. Each Hoodie has masks & layers for nearly every single seam on the hoodie. Each seam has the following layers which make it really easy to experiment with many design possibilities.
1. The shape layer (this acts as the mask)
2. Fill Layer
3. Pattern Layer (more on this in a minute)
4. Art Layer.
To the left you can see all the seams that we’ve already masked out for you.
These layers make it a snap to mockup complicated designs that need to look real. For example, you can realistically mockup diagonal stripes on each of the pockets, or give your design dark cuffs. Besides all these layers, you’ll notice lots little details, like how the tag & drawstrings are separated for some extra realism.
The Colors Group has eight preset base colors, and you can of course fill any of these layers for any base color you choose.
2. The Textile Patterns
 The Hoodie Design Pack also includes 93 Seamless Textile Patterns for quick experimentation with the templates. Think of these as “presets” to start stimulating design ideas & options.
Textile Patterns include:
- Herringbone
- Houndstooth
- Zebra, leopard & crackle print
- Plaid & Argyle
- Shearling
The hoodie mockups below were created in a few clicks using a few of the included patterns. Cool!

THAT’S IT!
Phew! We went from sketch to scan to final Illustration to mock up. Then we went ahead and explored the Hoodie Design Pack in a little more detail. I think that’s enough for this time! I hope you ended up with a killer illustration and had fun playing around with the templates.