Blog
How the Design Workflow is Changing
Once upon a time, there was a method of design that involved plenty of time for brainstorming and upfront big picture planning. Designers could meet with all interested parties, puzzle over design challenges, and play with problems until they’d found a (theoretical) solution.
But that approach to design workflow has been largely relegated to the history books—some would say, for the betterment of all. As the development world has embraced the Agile process with systems like scrums and big data analytics, designers find themselves under increasing pressure to iterate quickly, rather than spending lots of time planning for project demands that are highly likely to change just a week or even a day after the plan is finally set. This sounds to many experienced designers like it’s anathema to the creative process, and it can be, if we try to adapt Agile development practices wholesale, without tweaking them to fit the design workflow or mentality.
Conversely, the many designers who do make Agile their own find it can actually be a boon for creativity, forcing them out of productivity-deadening perfectionism and keeping them on their toes as they try to meet changing constraints. How are these designers embracing the more dynamic Agile approach to workflow while still holding strong to the more static elements of the design process that keep them surefooted and on solid ground? Let’s take a look at a few key approaches from beginning to end.
1. Start and End With the Client
We’re all familiar with those nightmare clients who call five times a day. We all also know the frustration of the client who says, “I don’t know” and “Sure,” to everything, only to decide upon seeing the finished product that it’s, “Not quite right.” While there’s no catch all solution for these kinds of difficulties, there’s a lot that can be done when you adopt the agile mentality of taking the client on almost as a team member. That means giving them a constant stream of deliverables, even if it’s something small, and communicating feedback to the rest of the team during your daily or weekly stand up meetings so you can adjust accordingly. Clients can also be helpful in maintaining that on-brand feel, as well as in testing any prototypes or clarifying just what the demands of the job entail as they see it all come together.
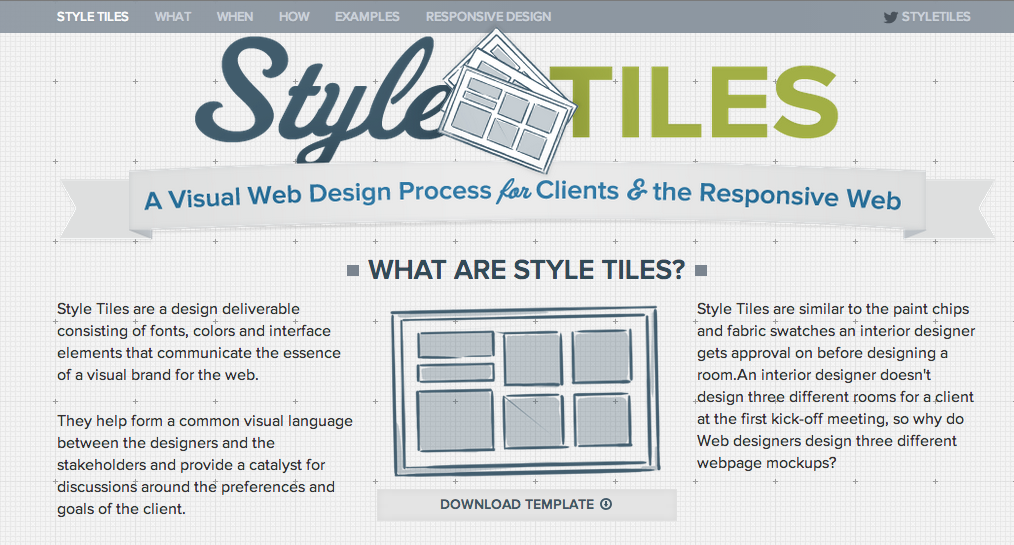
To do this, you may want to assign a liaison between you and the client to handle the bulk of customer feedback, so you can focus on design work. It’s also important to shift away both from static, labor intensive PSD mockups of pages that you may have to radically change or decide not to make at all, as well as from mood boards, which are often too vague to be of any help. Instead, try using a tool like Style Tiles, which will enable you to produce the smaller deliverables like fonts, colors and page elements, that will form the basis of your site design, rather than focusing on that static bigger picture. Style tiles can be used throughout the process, from visual brainstorms to the many adjustments that need to be made throughout every iteration. What’s more, you can use style tiles to combine elements across each tile, so you can constantly adjust and merge looks.
2. Do the Heavy Lifting Before a Project “Begins”
If you hadn’t guessed it already, there’s just no time in the Agile design process to spend a good 15 hours producing a PSD mockup, especially if it doesn’t lead to a workable product in the end (and it often doesn’t). In contrast, designing extensive style guides during the brainstorming process can provide the best kind of jumping off point. In saying this, I’m not referring to those basic, brand style guides, but instead to coded style guides that are devoted to page elements, like buttons, typography, headers and so forth. Once coded, these page elements not only give the client a much better sense of the product, but they’re also a lot easier to implement when the designer does begin work on the “true” product, i.e. landing pages. A coded style guide will allow you to easily change your design as you go, without having those heart stopping, “This isn’t what I asked for” moments at the end of a project. In essence, this means shifting from top down to bottom up design.

3. Iterate Frequently, But Don’t Lose Sight of the Big Picture
Ready. Set. Iterate! Two of the most commonly implemented and famous elements of Agile are iterations and sprint planning. During each iteration, design teams limit themselves to achieving a set of achievable goals, which they’ll then pursue with singular intensity. This folds in nicely with the concept of constantly delivering products to the client, as each iteration should produce something to present, no matter how unpolished.
A common (and well-justified) complaint amongst designers about the iterative process is that it becomes hyper-localized, so that the big picture becomes murky. This is one area where designers can really benefit from breaking a little bit away from the classic Agile development process with design spikes. When a design spike is called, all work on anything that would be dependent on the spike ceases, and one designer is elevated to “owner” to stand alongside the product owner. New team members can be brought on if their perspective would be useful, but the most important part of the idea is that it ceases all action until this bigger issue or viewpoint is fixed or achieved.
Another effective strategy is to adopt at least the philosophy behind the development process continuous integration, in which developers constantly integrate their work, rather than waiting until the product is done to fix a huge backlog of unforeseen bugs. Similarly, designers can keep that bigger picture in mind by constantly integrating their work across the design team, and testing elements as they go.
4. Evaluate Your Efforts
The Agile design process can be highly effective, but only if you’ve got your strategies done. Implemented the wrong way, Agile can be more distracting and anxiety-inducing than anything else, leading to far lower productivity rates than the classic Waterfall method. At the end of a project, or perhaps even at the end of every iteration, take the time to evaluate how your implementation of Agile is going, and whether or not any tweaks need to be made. Of course, you’ll also need to evaluate your design efforts, so that you can properly adjust your backlog and add the most appropriate new tasks into the next iteration.
Final Thoughts
There’s no getting around it: Agile is taking the development world by storm. Whether that makes your little designer heart jump for joy or it makes your blood boil, it’s a reality we all have to face if we’re going to continue working hand in hand with developers. The best thing we can do is embrace these changes and make them work for what designers actually do. And who knows? You might just find yourself creatively unlocked as you go.